Register a dedicated server to AMS
Overview
This article walks you through the lifecycle of a dedicated server in AccelByte Multiplayer Servers (AMS) and how to register a dedicated server to AMS using the AGS Game SDK.
The SDK used to develop both the Server-side and the game client-side is the same SDK.
Prerequisites
Before you begin this guide, you must have:
Set up an IAM client for dedicated servers, preferably a confidential client. No additional permissions are required. To learn how, see Create an IAM client.
Prepared a dedicated server executable, built using the Linux architecture.
noteAMS only supports dedicated servers that are built with the Linux architecture.
Installed and configured the AGS Game SDK for your project. The AGS Game SDK is available on both Unreal Engine and Unity. See the SDK setup guides to learn how to install the SDKs.
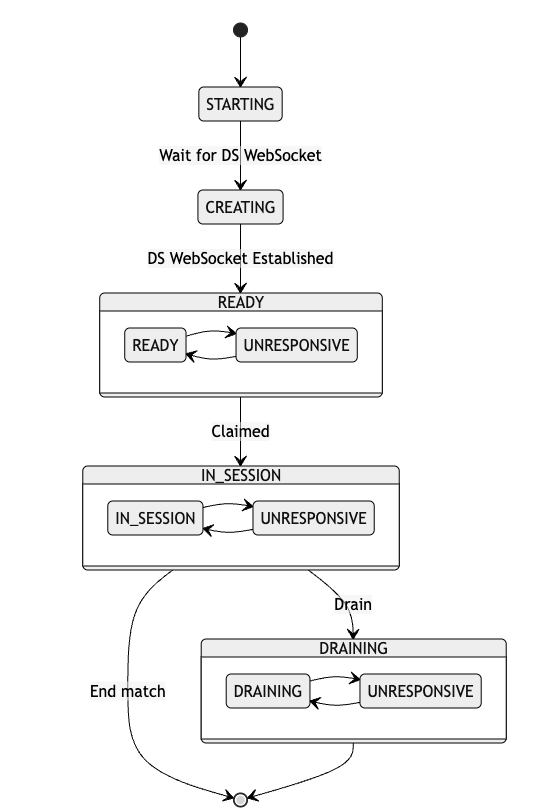
The lifecycle of a dedicated server under AMS
The local watchdog uses states to keep track of the lifecycle of a dedicated server. The states are:
- Starting: the dedicated server is spun up by the watchdog. The watchdog is waiting for a websocket connection to be established with the dedicated server.
- Creating: the dedicated server has established a websocket connection with the watchdog, and is loading any necessary resources to serve a game session.
- Ready: the server is ready to serve a game session.
- In Session: the server is serving a game session.
- Unresponsive: the server has failed one or more health checks.
- Draining: the server is sent the drain command and will soon be terminated.
The change of states are best described by the following diagram:
The dedicated server is required to tell when it will be ready by using the SendReadyMessage() API. This is because the dedicated server sometimes requires loading its own assets (such as meshes for a game level) in order to serve a game session. The time required to load such assets varies greatly. The SendReadyMessage() API is used so that the dedicated server has time to do this, and can then notify the watchdog, and in turn the fleet command that it is ready to serve a game session. The watchdog will then change the dedicated server state from Creating to Ready.
The APIs we created are only applicable when your dedicated server is hosted within an AMS environment (when it is uploaded to AMS or launched by the AMS Simulator).
We took extra care to ensure that the SDK you integrate will not block your dedicated server from running on its own, even if it fails to connect to a local watchdog or an AMS simulator. This is to ensure that you can continue working on your dedicated server locally without having to worry about the AMS requirements.
When you are ready to start testing your integration with AMS, you can do so locally by using the AMS Simulator, without the need to upload your dedicated server onto AMS. Learn more in Debugging dedicated servers using the AMS simulator.
Listening to the correct ports
AMS dedicated server images are containerized during delivery, but not during execution. This means that your dedicated server will be assigned arbitrary port numbers as determined by the local watchdog.
When your dedicated server starts, you can pass these port numbers into your server in the form of command line arguments, so that your dedicated server can be told which ports to listen to.
To learn more about configuring your command line argument, see Construct your dedicated server command.
Register a dedicated server to AMS
To register a dedicated server to AMS, follow these steps, in this order:
Set up your environment
- Unreal OSS
- Unity
Add the following configuration into your DefaultEngine.ini file.
[OnlineSubsystemAccelByte]
bManualRegisterServer=True

[/Script/AccelByteUe4Sdk.AccelByteSettings]
bServerUseAMS=True
Mixing AB Unreal SDK and AB Unreal OSS usage is not fully supported and, in most cases, will not function. We recommend to integrate using only the AB OSS as it is more streamlined as opposed to only using the AB SDK.
To register your dedicated server, the SDK requires a dedicated server ID on Unity startup. A dedicated register ID is registered using Unity command-line arguments:
- Editor
- Linux Server
Set the arguments of your project from Unity Hub before starting the project.
-ABDsId "Dedicated Server ID Value"
Set the dedicated server ID as a command-line argument before executing the server binary.
[YourBinaryName].x86_64 -ABDsId "Dedicated Server ID Value"
To direct the game client to connect to AMS dedicated server, open the SDK editor on the menu toolbar AccelByte > Edit Client Settings. Enable the checkbox on Service Url Configs > Use AMS QoS Server Url and click Save.
Register your dedicated server
When your dedicated server is created by a local watchdog, it will transition from the "Starting" state into the "Creating" state once a websocket connection is established between the dedicated server and the local watchdog. During the "Creating" state, the server will start to initialize and load all the necessary assets that it requires to serve a game session. During this time, the server is subjected to the creation timeout, which will automatically remove the server when the timeout is exceeded.
Once your server has finished loading, and is ready to serve a game session, your server should notify AMS by calling the respective API:
- Unreal
- Unreal OSS
- Unity
FRegistry::ServerAMS.SendReadyMessage();
const FOnRegisterServerComplete OnServerReady = FOnRegisterServerComplete::CreateUObject(this, &YourClass::OnServerReady);
SessionInterface->SendServerReady(TEXT(""), OnServerReady);

//The first argument of SendServerReady(), the `sessionName` parameter, is not utilized in AMS. You can simply pass TEXT("") as its value.
- Editor
- Linux Server
In the Unity Editor, the game needs to wait for the SDK to be connected with AMS.
var ams = AccelByteSDK.GetServerRegistry().GetAMS();
ams.OnOpen += OnAmsConnected;

void OnAmsConnected()
{
    ams.OnOpen -= OnAmsConnected;
    ams.SendReadyMessage();
}
AccelByteSDK.GetServerRegistry().GetAMS().SendReadyMessage();
Listen to the drain signal
The drain signal tells a dedicated server that it will soon be terminated. The dedicated server will be set to the Draining state and is subjected to the drain timeout. Upon reaching the drain timeout, the watchdog will automatically terminate the dedicated server. This gives a configurable period of time for your dedicated server to do any last minute action and then terminate itself peacefully. There are a number of reasons why your dedicated servers are sent a drain signal:
- The fleet is deactivated, sending all dedicated servers in the Ready state into the Draining state (dedicated servers that are in session will be allowed to run their course).
- The nodes that host the dedicated servers need to be taken down for maintenance.
- The dedicated servers are sent the drain signal explicitly by an operator from your organization.
To register a handler to listen to the drain signal:
- Unreal
- Unreal OSS
- Unity
AccelByte::GameServerApi::ServerAMS::FOnAMSDrainReceived OnAMSDrainReceivedDelegate = AccelByte::GameServerApi::ServerAMS::FOnAMSDrainReceived::CreateThreadSafeSP(SharedThis(this), &ClassName::OnAMSDrain);
FRegistry::ServerAMS.SetOnAMSDrainReceivedDelegate(OnAMSDrainReceivedDelegate);
FOnAMSDrainReceivedDelegate OnAMSDrainReceivedDelegate = FOnAMSDrainReceivedDelegate::CreateUObject(this, &ClassName::OnAMSDrain);
OnAMSDrainReceivedHandle = SessionInterface->AddOnAMSDrainReceivedDelegate_Handle(OnAMSDrainReceivedDelegate);
AccelByteSDK.GetServerRegistry().GetAMS().OnDrainReceived += () =>
{
    // Drain callback
};
Code example
- Unity
using AccelByte.Core;
using AccelByte.Models;
using AccelByte.Server;
using System.Collections;
using UnityEngine;

public class AmsDsConnection : MonoBehaviour
{
    bool isAmsReady = false;

    DedicatedServer ds;
    ServerDSHub dsHub;
    ServerAMS ams;

    IEnumerator Start()
    {
#if !UNITY_EDITOR && !(UNITY_STANDALONE_LINUX && UNITY_SERVER)
        // This feature only available for Linux Server & Unity Editor
        yield break;
#endif
        // Ensure DS is logged in and ready
        ds = AccelByteSDK.GetServerRegistry().GetApi().GetDedicatedServer();
        Result loginResult = null;
        ds.LoginWithClientCredentials(result =>
        {
            if (result.IsError)
            {
                // Do something if LoginWithClientCredentials has an error
                Debug.Log($"Error LoginWithClientCredentials, Error Code: {result.Error.Code} Error Message: {result.Error.Message}");
                return;
            }

            loginResult = result;
            // Your additional logic when DS successfully logins
        });

        yield return new WaitUntil(() => loginResult != null);

        // Connect AMS (when not on server build) and set AMS as ready
        ams = AccelByteSDK.GetServerRegistry().GetAMS();
        if (ams == null)
        {
            Debug.LogError("Failed to connect to AMS, please see SDK warning log");
            yield break;
        }
#if UNITY_STANDALONE_LINUX && UNITY_SERVER
        ams.SendReadyMessage();
        isAmsReady = true;
#else
        // This code is intentionally for editor only.
        ams.OnOpen += OnAmsConnected;
#endif

        yield return new WaitUntil(() => isAmsReady);

        string myServerId = AccelByteSDK.GetServerRegistry().Config.DsId;
        // Connect DSHub and your logic to its events.
        dsHub = AccelByteSDK.GetServerRegistry().GetApi().GetDsHub();
        dsHub.Connect(myServerId);
        dsHub.OnConnected += OnDsHubConnected;
        dsHub.OnDisconnected += OnDsHubDisconnected;
        dsHub.MatchmakingV2ServerClaimed += OnDsHubServerClaimed;
        // DS Hub has many more events that you can listen to for your custom game logic.
    }

    void OnAmsConnected()
    {
        Debug.Log("AMS connected");
        ams.SendReadyMessage();
        isAmsReady = true;
        ams.OnOpen -= OnAmsConnected;
    }

    void OnDsHubConnected()
    {
        Debug.Log("Ds Hub connected");
        // Your logic when DS Hub successfully connects.
    }

    void OnDsHubDisconnected(WsCloseCode closeCode)
    {
        Debug.Log("Ds Hub disconnected");
        // Your logic when DS Hub has disconnected.
    }

    void OnDsHubServerClaimed(Result<ServerClaimedNotification> claimedNotificationResult)
    {
        ServerClaimedNotification claimedNotification = claimedNotificationResult.Value;
        // Your logic when this instance is claimed for a game session
    }
}