Manage access control for applications
Introduction
AccelByte Gaming Services (AGS) defines an Identity and Access Management (IAM) client as an application, such as a game server or website, that requests access to protected platform resources. IAM clients enable you to control which resources an application can access, as opposed to a user.
This article contains information on:
- How IAM clients work and IAM client types.
- Creating and configuring IAM clients and their permissions in the AGS Admin Portal.
- Retrieving an application access token using AGS SDKs.
Prerequisites
Access to the AGS Admin Portal and the permissions for IAM clients management.
Make sure your Admin Portal account has these permissions before you attempt to configure IAM clients.
Usage Resource Action Create a Client ADMIN:NAMESPACE:{namespace}:CLIENT Create Retrieve Client ADMIN:NAMESPACE:{namespace}:CLIENT Read Update Client ADMIN:NAMESPACE:{namespace}:CLIENT Update Delete Client ADMIN:NAMESPACE:{namespace}:CLIENT Delete Add Client Permission ADMIN:NAMESPACE:{namespace}:CLIENT Update Update Client Permission ADMIN:NAMESPACE:{namespace}:CLIENT Update Delete Client Permission ADMIN:NAMESPACE:{namespace}:CLIENT Update AGS StarterHaving the Studio Admin or Game Admin role in your AGS account allows you to directly handle IAM clients in the Admin Portal.
How IAM clients work
AGS IAM clients implement the OAuth 2.0 framework. You can define this under the publisher or game namespace, depending on whether the intended application is specific to one of your games or used by your publisher platform.
IAM client types
There are two client types based on the OAuth 2.0 Client Type framework:
- A confidential client requires a combination of Client ID and Client Secret to authorize on the backend. You need confidential clients when you need server-to-server (S2S) calls to admin endpoints in AGS. As a result, you will typically define specific access permissions on the client. Therefore, you should only use confidential clients in cases where you can control who has access to the client's ID and secret to prevent unauthorized users from accessing your services.
- A public client does not specify a client secret; you only need the client ID. Public clients are best for applications that require a user to log in with their user account and only need client-to-server calls to public endpoints in AGS. In this case, the access permissions come from the user's account.
Most used IAM clients
Here are the most used IAM client archetypes:
- Game client: configure IAM clients for game clients as Public in most cases.
- Game server hosted by Armada: configure IAM clients for dedicated servers as Public or Confidential. However, you need to assign permissions to the client if your dedicated servers don't log in as a user. This is the most common case.
- Dedicated server uploader: IAM clients for uploading dedicated server builds. Since access for uploaders is usually tightly controlled, it is best to specify these types of clients as Confidential.
Manage IAM clients
This section covers how to create an IAM client and add permissions to a client.
Create an IAM client
Follow the steps applicable to your AGS tier.
- AGS Starter
- AGS Premium
In the AGS Admin Portal, go to your namespace.
On the sidebar, select Game Setup > Games and Apps > IAM Clients.
On the IAM Clients page, click on the + Create IAM Clients button. The Create IAM Client form appears.
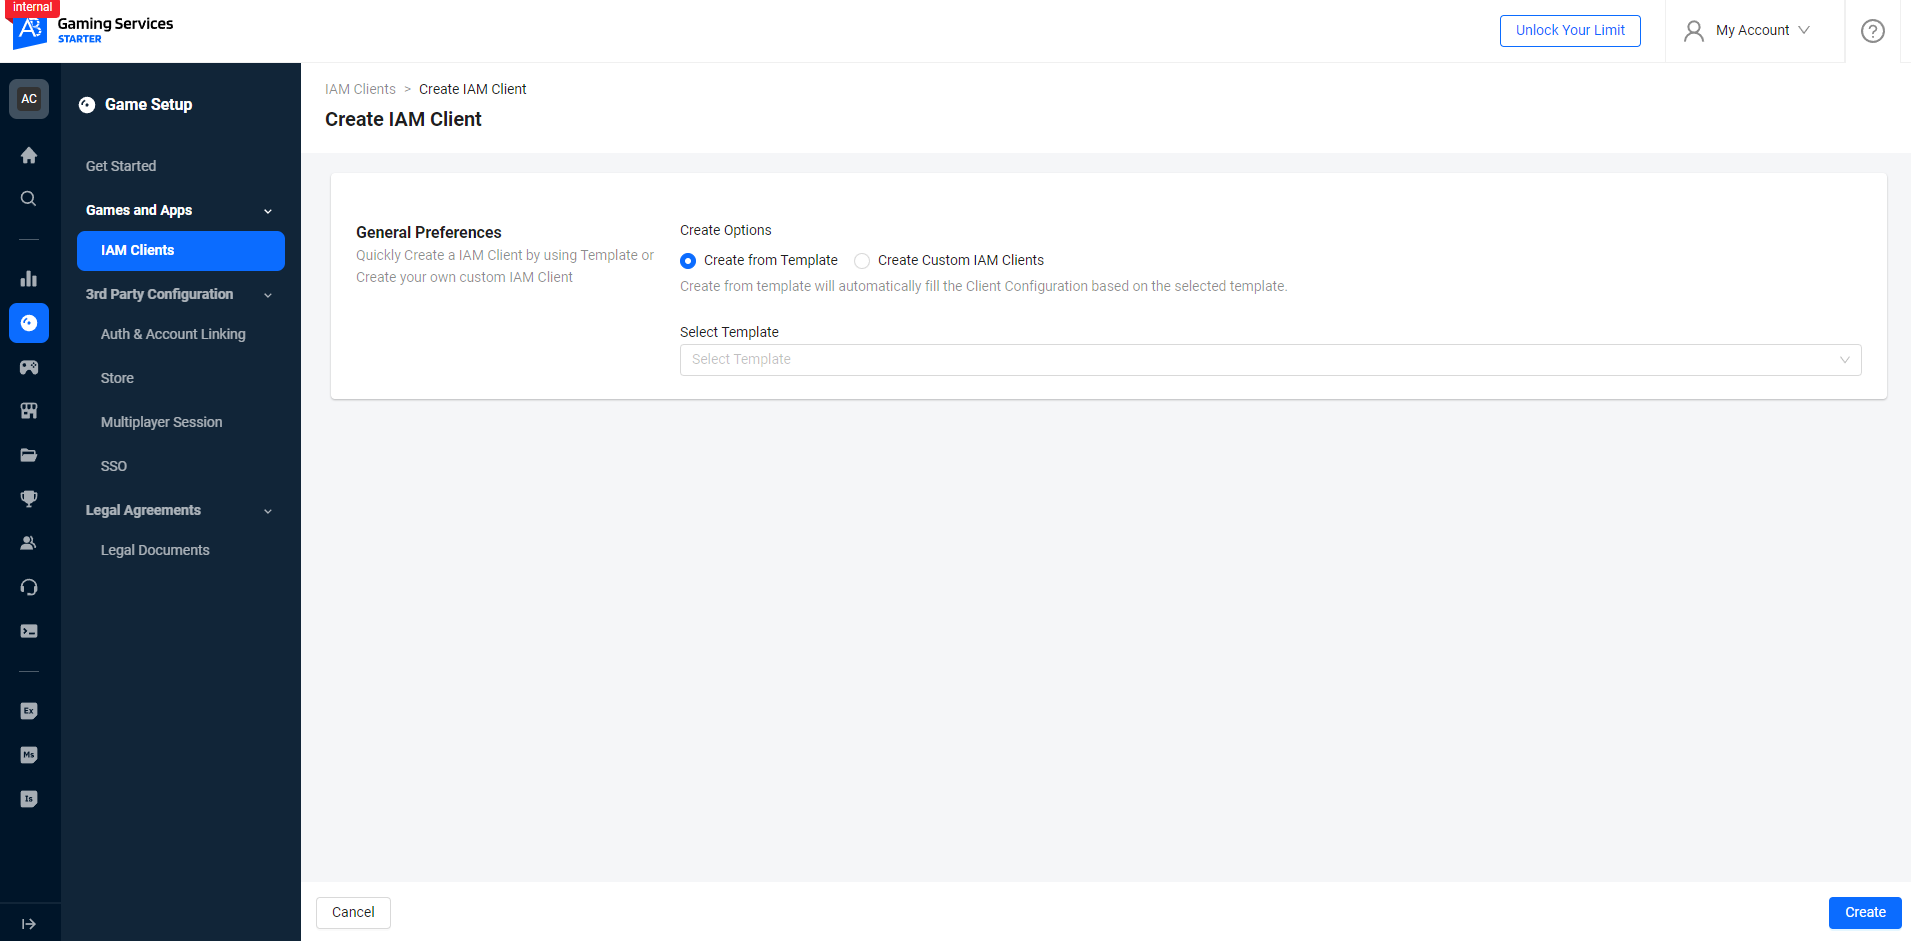
In the General Preferences section, select a create option. Then, fill in the required information:
- Create from Template
- Create custom IAM Clients
Choose this option if you want to use a template to create an IAM client.
From the Select Template dropdown, select the template you want use:
- Game Client: used by game clients to facilitate login to AccelByte. Upon successful login, it provides a user token that grants access to various publicly available features within the AccelByte platform. Specific for the Game Client template, the ‘Platform’ field is also required to be filled.
- Dedicated Server: used by servers or dedicated servers (DS) to obtain a client token necessary for accessing AccelByte's administrative features.
- Dedicated Server Tools: used for uploading Dedicated Server (DS) images to the AccelByte Multiplayer Services (AMS) server and for facilitating the operation of AMS tools.
- Custom Backend Tooling: used for custom backends developed by clients themselves, it is necessary to add permissions as required, in alignment with the features available in AGS.
After selecting a template, the Client Name, Client Type, Redirect URI, and Description fields in the Client Configuration section will be auto-filled by the template.
noteThe sections and fields that appear and are pre-filled after you select a template may vary based on the template.
Fill in the required information:
Client Configuration
Client Name: type in the name for the client. The AGS system will use this name to identify the IAM client in user-facing forms and documents.
Client Type: define how the client interacts with AGS services. Choose between Public and Confidential. For more information, refer to IAM client types.
Secret: this serves as the password for confidential clients. You can fill in the field manually with your own password following the recommended format, or click Generate to get the AGS system create one for you.
dangerEnsure that you keep a secure copy of the client secret. After you create the client, this will no longer be visible or accessible.
Redirect URI
- For web-based clients (such as websites or launchers), set the value to the URL that the system redirects the user to upon successful login.
- For non-web-based clients (such as game servers, game clients, or server uploaders), set the value to
http://127.0.0.1.
tipYou can add multiple URIs by clicking the + Add more button.
Platform (only applicable to Game Client template): from the dropdown, select which third-party platform the SDK client will run on. If you choose not to bind the client to any third-party platform, leave it blank.
noteThe system requires this platform information for cross-platform features. For example, cross-platform virtual currency and wallet.
Description (Optional): describe the function of the IAM Client.
Advanced Configuration: this section allows you to override behaviors for specific IAM clients. Click on Show Advanced Configuration to display the section.
Scopes: this is a mechanism in OAuth 2.0 that limits which resources an IAM Client can access. From the dropdown, select the services that you want to be accessible to the IAM client. To learn more about scopes, see the OAuth 2.0 documentation.
Target Audience (Optional): this controls which services the user or application token can access, based on the purpose of this client. The client's Base URI, contained in the target audience dropdown, represents the target service.
noteThis serves as a white list to allow backend services to quickly reject connection attempts before checking client or user permissions. When the IAM client attempts to access a service endpoint, the service first checks the client's Target Audience list. The system rejects the connection attempt if the service's URI does not match the Base URI of any of the clients in the Target Audience field. If the client passes the Target Audience check, or if the client's Target Audience field is empty, the service proceeds to the next authentication step in the client's request, such as checking its permissions and scopes.
Base URI (Optional; works together with Target Audience): this is the service's identity in the audience implementation.
Override Expiration Time: switch on this toggle to override the default Access Token Expiration Time and Refresh Token Expiration Time and manually configure their values. This allows you to configure how long your players can stay logged in when they use the third-party app associated with the IAM client to log in to your player portal.
In the Permissions section, start adding permissions to the IAM client. Find the permissions that you want to add to the client. Then, for each permission, tick the boxes of the actions (Read, Create, Update, and/or Delete) that you want it to have. For easier navigation, click on Hide/Show unselected permissions. You can skip this step and proceed to step 5 to creating the IAM client. You can add and edit the permissions of an IAM client at a later time. See Add and edit IAM client permissions.
noteIf you're creating a public IAM client, this section will not appear on the form. You can only add permissions to confidential IAM clients.
Choose this option if you know what IAM client to create and the permissions you need to add to it. After selecting this option, the system displays the Client Configuration and Advanced Configuration sections.
Fill in the required information:
Client configuration
Client ID: system-generated unique ID for the IAM client. This cannot be edited.
Client Name: type in the name for the client. The AGS system will use this name to identify the IAM client in user-facing forms and documents.
Client Type: define how the client interacts with AGS services. Choose between Public and Confidential. For more information, refer to IAM client types.
Secret: this serves as the password for confidential clients. You can fill in the field manually with your own password following the recommended format, or click Generate to get the AGS system create one for you.
dangerEnsure that you keep a secure copy of the client secret. After you create the client, this will no longer be visible or accessible.
Redirect URI
- For web-based clients (such as websites or launchers), set the value to the URL that the system redirects the user to upon successful login.
- For non-web-based clients (such as game servers, game clients, or server uploaders), set the value to
http://127.0.0.1.
tipYou can add multiple URIs by clicking the + Add more button.
Platform: from the dropdown, select which third-party platform the SDK client will run on. If you choose not to bind the client to any third-party platform, leave it blank.
noteThe system requires this platform information for cross-platform features. For example, cross-platform virtual currency and wallet.
Description (Optional): describe the function of the IAM Client.
Advanced Configuration: this section allows you to override behaviors for specific IAM clients. Click on Show Advanced Configuration to display the section.
Scopes: this is a mechanism in OAuth 2.0 that limits which resources an IAM Client can access. From the dropdown, select the services that you want to be accessible to the IAM client. To learn more about scopes, see the OAuth 2.0 documentation.
Target Audience (Optional): this controls which services the user or application token can access, based on the purpose of this client. The client's Base URI, contained in the target audience dropdown, represents the target service.
noteThis serves as a white list to allow backend services to quickly reject connection attempts before checking client or user permissions. When the IAM client attempts to access a service endpoint, the service first checks the client's Target Audience list. The system rejects the connection attempt if the service's URI does not match the Base URI of any of the clients in the Target Audience field. If the client passes the Target Audience check, or if the client's Target Audience field is empty, the service proceeds to the next authentication step in the client's request, such as checking its permissions and scopes.
Base URI (Optional; works together with Target Audience): this is the service's identity in the audience implementation.
Override Expiration Time: switch on this toggle to override the default Access Token Expiration Time and Refresh Token Expiration Time and manually configure their values. This allows you to configure how long your players can stay logged in when they use the third-party app associated with the IAM client to log in to your player portal.
Click Create. The new IAM client is created and added to the IAM Clients list with a system-generated client ID, which cannot be edited. Proceed to adding permissions to the IAM client.
In the AGS Admin Portal, go to your namespace.
On the sidebar, select Authorizations > IAM Clients.
On the IAM Clients page, click on the + Create IAM Clients button. The Create New IAM Client form appears.
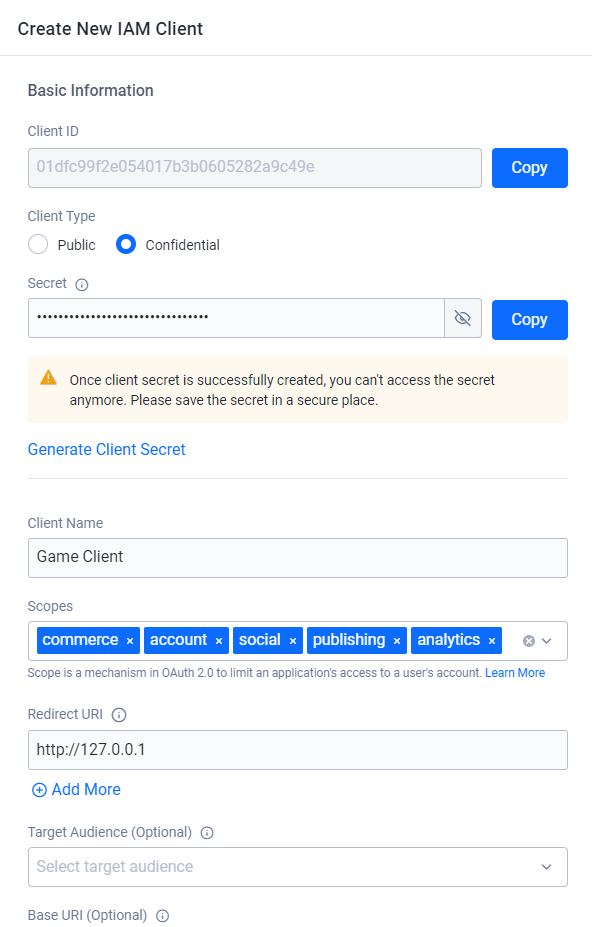
Fill in the required information:
Basic Information
Client ID: system-generated unique ID for the IAM client. This cannot be edited.
Client Type: define how the client interacts with AGS services. Choose between Public and Confidential. For more information, refer to IAM client types.
Secret (Only applicable to confidential type): this serves as the password for confidential clients. You can fill in the field manually with your own password following the recommended format, or click Generate to get the AGS system create one for you.
dangerEnsure that you keep a secure copy of the client secret. After you create the client, this will no longer be visible or accessible.
Client Name: type in the name for the client. The AGS system will use this name to identify the IAM client in user-facing forms and documents.
Scopes: this is a mechanism in OAuth 2.0 that limits which resources an IAM Client can access. From the dropdown, select the services that you want to be accessible to the IAM client. To learn more about scopes, see the OAuth 2.0 documentation.
Redirect URI
- For web-based clients (such as websites or launchers), set the value to the URL that the system redirects the user to upon successful login.
- For non-web-based clients (such as game servers, game clients, or server uploaders), set the value to
http://127.0.0.1.
tipYou can add multiple URIs by clicking the + Add more button.
Target Audience (Optional): this controls which service endpoints the IAM client can access. The Target Audience dropdown contains a list of clients from the namespace that the IAM client is in, along with the Base URI value that the client specifies.
noteThis serves as a white list to allow backend services to quickly reject connection attempts before checking client or user permissions. When the IAM client attempts to access a service endpoint, the service first checks the client's Target Audience list. The system rejects the connection attempt if the service's URI does not match the Base URI of any of the clients in the Target Audience field. If the client passes the Target Audience check, or if the client's Target Audience field is empty, the service proceeds to the next authentication step in the client's request, such as checking its permissions and scopes.
Base URI (Optional; works together with Target Audience): if another client (Client B) will use this client (Client A) as its target audience, use the URL of Client B. If not, leave blank.
Description (Optional): describe the function of the IAM Client.
Client SDK Configuration
Platform (Optional): from the dropdown, select which third-party platform the SDK client will run on. If you choose not to bind the client to any third-party platform, leave it blank.
noteThe system requires this platform information for cross-platform features. For example, cross-platform virtual currency and wallet.
Advanced Configurations: this section allows you to override behaviors for specific IAM clients.
Two-Factor Authentication: switch on this toggle to enable two-factor authentication (2FA) for the IAM client.
Override Expiration Time: switch on this toggle to override the default Access Token Expiration Time and Refresh Token Expiration Time and manually configure their values. This allows you to configure how long your players can stay logged in when they use the third-party app associated with the IAM client to log in to your player portal.
Click Create to create the IAM client. The details page of the IAM client appears. If you created a confidential IAM client, you can proceed to adding permissions to it. See Add and edit IAM client permissions.
Add and edit IAM client permissions
You can add and edit the permissions of an existing confidential IAM client in the AGS Admin Portal.
Here's a list of example permissions required by a Dedicated Server client.
Dedicated Server Client (Mandatory)
| Permission | Action |
|---|---|
| ADMIN:DSM | READ |
| NAMESPACE:{namespace}:DSM:SERVER | UPDATE |
Dedicated Server Client (Optional)
| Permission | Action |
|---|---|
| ADMIN:NAMESPACE:{namespace}:ENTITLEMENT | READ |
| ADMIN:NAMESPACE:{namespace}:PARTY:STORAGE | READ, UPDATE |
| ADMIN:NAMESPACE:{namespace}:STATITEM | UPDATE |
| ADMIN:NAMESPACE:{namespace}:USER:*:ACHIEVEMENT | UPDATE |
| ADMIN:NAMESPACE:{namespace}:USER:*:CLOUDSAVE:RECORD | CREATE, READ, UPDATE, DELETE |
| ADMIN:NAMESPACE:{namespace}:USER:*:ENTITLEMENT | READ |
| ADMIN:NAMESPACE:{namespace}:USER:*:PUBLIC:CLOUDSAVE:RECORD | CREATE, READ, UPDATE |
| ADMIN:NAMESPACE:{namespace}:USER:*:STATITEM | CREATE, READ, UPDATE |
| ADMIN:NAMESPACE:{namespace}:USER:*:WALLET | UPDATE |
| NAMESPACE:{namespace}:SESSION | CREATE, READ, UPDATE |
| ADMIN:NAMESPACE:{namespace}:MATCHMAKING:CHANNEL | CREATE, DELETE |
To add and edit the permissions of an IAM client, follow these steps:
- AGS Starter
- AGS Premium
In the AGS Admin Portal, go to your namespace.
On the sidebar, select Game Setup > IAM Clients. The IAM Clients page appears.
From the list of IAM clients, find the client with the permissions you want to update. Click on its corresponding View button. The details page of the IAM client appears.
At the top-right hand side of the IAM client, click on Edit. The Edit IAM Client form appears.
On the form, scroll down to the Permissions section.
Find the permissions that you want to add or edit. Tick the boxes of the actions (Read, Create, Update, and/or Delete) that you want to add or remove from the permission. For easier navigation, click on Hide/Show unselected permissions.
Click Save to save your changes.
In the AGS Admin Portal, go to your namespace.
On the sidebar, select Authorizations > IAM Clients. The IAM Clients page appears.
From the list of IAM clients, click on the IAM client with the permissions you want to update. The details page of the IAM client appears.
On the details page, go to the Permissions tab. You will see the list of permissions that the client currently has.
To update the permissions, do any of the following:
- Add a new permission to the client by clicking + Add. Fill in the Resource field with a permission tag. A permission resource is a string containing multiple tokens that the system uses to grant access to specific resources. Select the actions you want to enable for the permission, and then click Confirm to create the permission and add it to the permissions list of the IAM client.
- Edit an existing permission in the client. From the list, click on the permission's Edit option. You can rename the permission and select or de-select its actions as needed. Then, click Edit to save your changes.
- Delete a permission by clicking Delete and again on the confirmation message.
Get application access token using AGS SDKs
A Credential client requires a valid access token for service-to-service (S2S) calls to AGS services.
The code below generates a valid access token using AGS SDK for a Credential client.
- Unreal
- Unity
bool bServerLoggedIn = false;
bool bServerLoginComplete = false;
FRegistry::ServerOauth2.LoginWithClientCredentials(FVoidHandler::CreateLambda([&bServerLoggedIn, &bServerLoginComplete]()
{
   UE_LOG(LogAccelByteEcommerceTest, Log, TEXT("Server Login Success"));
   bServerLoginComplete = bServerLoggedIn = true;
}), FErrorHandler::CreateLambda([&bServerLoggedIn, &bServerLoginComplete](int32 ErrCode, FString const& ErrMsg)
{
   UE_LOG(LogAccelByteEcommerceTest, Error, TEXT("Server Login Success"));
   bServerLoginComplete = true;
}));
WaitUntil(bServerLoginComplete, "Waiting for server logged in...");
DedicatedServer server = AccelByteServerPlugin.GetDedicatedServer();
Result loginServerResult = null;
server.LoginWithClientCredentials(result => loginServerResult = result);
yield return TestHelper.WaitForValue(() => loginServerResult);