Create a fleet to manage dedicated server allocation
Introduction
A fleet scales virtual machines, and manages dedicated servers that are hosted within those virtual machines, based on regional scaling configurations.
In Starter, you can only create up to three fleets and assign them to the North America East (us-east-2) region only.
This article walks you through how to create and customize a fleet in AccelByte Multiplayer Servers (AMS) to suit your needs.
Prerequisites
Before you begin this guide, you must have:
- Access to your game's namespace and account in the AGS Admin Portal.
- Integrated a dedicated server with the AGS Server SDK.
- Uploaded a dedicated server build to AMS.
- Enabled regions to which you can assign fleets. To learn how, see Enable regions
Enable regions
Go to your game namespace in the AGS Admin Portal.
On the sidebar, open the AccelByte Multiplayer Servers menu and select Fleet Manager or Fleets. The Fleets page appears.
In the Region List section, switch on the toggle button of the regions you want to be available for your fleets.
AGS StarterIn Starter, the North America East (
us-east-2) region can only be enabled.
Create a fleet
AMS can start up your dedicated game servers whenever there is demand. However, before AMS can do so efficiently, it needs to have all the necessary data on how best to run your dedicated game servers, as well as where and when to run them. The fleet creation process will ensure that you have given all information required for AMS to manage your fleet.
To create a fleet, follow these steps:
Go to your game namespace in the AGS Admin Portal.
On the sidebar, open the AccelByte Multiplayer Servers menu and select Fleet Manager or Fleets. The Fleets page appears.
Click the + Create Fleet button. The Create Fleet form appears.
In the Fleet & Image section, do the following:
- Type in a name for your fleet. It must be unique within the namespace.
- Choose one dedicated server image that has been uploaded to the account. The fleet will start dedicated servers based on this image. You can search for an image by using its image ID or image name.
Click Next to go to the Deployment Profile section.
In the Deployment Profile section, adjust your timeout values as necessary.
Timeout
- Creation Timeout: The creation timeout starts when the local watchdog executes your dedicated server, and marks its state as Creating. This timeout gives a configurable time limit for your dedicated server to initialize, so that when your dedicated server fails to do so, AMS will remove the server, and return its resources back to the regional cluster.
- The creation timeout is applicable only when the dedicated server is in the Creating state. Once the dedicated server registers itself to the dedicated server manager, it will enter the Ready state.
- The default value for this timeout is 300 seconds.
- Session Timeout: The session timeout starts when the dedicated server starts serving a game session and enters the In Session state. It gives a time limit for your dedicated server to serve a game session, so that watchdog can remove stale servers that fail to exit themselves normally, once a game session has finished.
- The default value for this timeout is 7,200 seconds.
- Drain Timeout: The drain timeout starts when the dedicated server receives the drain signal from the local watchdog. This drain timeout tells the dedicated server it is about to be shutdown, and gives a time limit for your dedicated server to do any last minute actions and exit itself before the watchdog forcibly kills it.
- The default value for this timeout is 7,200 seconds.
- Unresponsive Timeout: The unresponsive timeout refreshes when a server finishes its last health check with AMS. It gives a time limit for your dedicated server to recover the connection to AMS in case of any network interruption. If the timeout is exceeded, AMS can remove the server and recover its resources.
- The default value for this timeout is 300 seconds.
Port Configuration: add the ports that you want the dedicated servers listen to. The actual port values for the ports you create will be generated at runtime. A default port is also automatically created for the fleet, which cannot be edited or deleted.
Command Line: in the command line box, add your dedicated server command and ensure that you specify any additional parameters that come after your executable to run your dedicated server. To learn how to construct your command, see Construct your dedicated server command.
- Creation Timeout: The creation timeout starts when the local watchdog executes your dedicated server, and marks its state as Creating. This timeout gives a configurable time limit for your dedicated server to initialize, so that when your dedicated server fails to do so, AMS will remove the server, and return its resources back to the regional cluster.
Click Next to go to the DS Host section.
In the DS Host section, select which instance type you want your dedicated servers to run in and the number of dedicated servers you want to run in the instance.
tipSearch for an instance type using its name. If you want additional information on the instance type, click the info button on the entry.
Click Next to go to the Region section.
In the Region section, configure the scaling strategy of each region where you want your fleet to host dedicated servers in. Click on a regions' respective Edit button (pencil icon) under Action. On the pop-up that appears, fill in the required information:
Min Servers: the minimum number of servers that the deployment needs to maintain, regardless of whether the servers are in the Ready (warmed buffer) or In Session (serving a game session) state. this value is useful to handle the baseline concurrent users, by ensuring that there are enough servers ready to go.
Max Servers: the maximum number of servers that the region can maintain. This value is useful as a limiter to make sure the cost of game servers will not go over budget.
Buffer Value: the buffer value tells the fleet the exact number of servers to maintain as warmed buffers.
note- Warm buffers are dedicated servers that are idling in the Ready state, ready to be claimed by a game session to start serving the session immediately.
- The fleet will always try to maximize the use of the AMS virtual machine instances. Therefore, your minimum and maximum number of servers will be rounded up to the closest multiple of the number of servers configure to run in each virtual machine. This ensures there are no wasted resources in the AMS instances that are being billed to your account.
Consider the example where the number of servers to be run in an virtual machine is five, minimum servers is three, and maximum servers is 28. The fleet will adjust the scaling behavior to minimum servers to five 5 and maximum servers to 30. Additionally, if the buffer value results in an additional virtual machine to be requested by the fleet, all five dedicated servers within the newly set up virtual machine will become buffers.
Click Save to save your configuration and repeat this step for each region you want to enable for the fleet.
Click Next to go to the Logs & Artifacts Sampling section.
In the Logs & Artifacts Sampling section, configure sampling rules for collecting dedicated server logs and artifacts. To learn about sampling rules, see the Sampling rules section.
Click Next to go to the Summary section.
Review your fleet configuration, then click the Create button. The Create Fleet pop-up appears.
(Optional) On the pop-up, you have the option to activate the fleet immediately after it's created. You can skip this step and activate or deactivate the fleet at a later time.
Click Create to create the fleet. Your fleet is immediately added to the Fleets list.
Construct your dedicated server command
Aside from a few required flags, you are free to construct your own dedicated server command. The required flags are as follows:
- Unreal
- Unity
- Config Injection
- Default Command
-ABDsId ${dsid} -ABPort ${default_port} -log ${log_file} -ABWatchdogUrl ${watchdog_url}
-dsid=${dsid} -port=${default_port} -log=${log_file} -watchdog_url=${watchdog_url}
-ABDsId, -dsid: Dedicated server ID
The dsid should be passed into the dedicated server by the flag -ABDsId ${dsid} or -dsid ${dsid}. The usage of the flag is covered by the SDK.
-ABPort, -port: Ports
Ports can be passed to the dedicated server with any format of flags that you desire. The substitution variable for your ports will follow the format: ${<<your_port_name_in_lowercase>>_port}.
-log: Log file path
The log file path can be passed to the dedicated server with any format of flags that you desire, followed by using the phrase ${log_file} for parameter substitution. Note that you will use the path to emit your logs, so that AMS can carry your logs to the log stash for later retrieval.
-ABWatchdogUrl, -watchdog_url: the URL to the local watchdog
The watchdog is the monitoring agent of the dedicated servers in the hosting machine. The SDK will connect to the watchdog automatically using the URL.
- Using
-ABas a prefix will add the ability to inject the AGS Unity SDK config. Therefore, you can get the value and use that as needed by calling this. - The code snippet will be added soon.
- Config Injection
- Default Command
-ABDsId ${dsid} -ABPort ${default_port} -logFile ${log_file} -ABWatchdogUrl ${watchdog_url}
-dsid ${dsid} -port ${default_port} -logFile ${log_file} -watchdogUrl ${watchdog_url}
-ABDsId, -dsid: Dedicated server ID
The dsid should be passed into the dedicated server by the flag -ABDsId ${dsid} or -dsid ${dsid}. The usage of the flag is covered by the SDK.
-ABPort, -port: Ports
Ports can be passed to the dedicated server with any format of flags that you desire. The substitution variable for your ports will follow the format: ${<<your_port_name_in_lowercase>>_port}.
-logFile: Log file path
The log file path can be passed to the dedicated server with any format of flags that you desire, followed by using the phrase ${log_file} for parameter substitution. Note that you will use the path to emit your logs, so that AMS can carry your logs to the log stash for later retrieval.
-ABWatchdogUrl, -watchdogUrl: the URL to the local watchdog
The watchdog is the monitoring agent of the dedicated servers in the hosting machine. The SDK will connect to the watchdog automatically using the URL.
Using -AB as a prefix will add the ability to inject the AGS Unity SDK config. Therefore, you can get the value and use that as needed by calling this.
var dsid = AccelByteSDK.GetServerRegistry().Config.DsId;
var port = AccelByteSDK.GetServerRegistry().Config.Port;
var watchdogUrl = AccelByteSDK.GetServerRegistry().Config.WatchdogUrl;
Additional variables for substitution
Additionally, AMS supports variable substitution for the following variables in your dedicated server command:
| Variable name | Description |
|---|---|
${creation_timeout} | Expands to the value of the creation timeout, as defined in the fleet. |
${session_timeout} | Expands to the value of the session timeout, as defined in the fleet. |
${drain_timeout} | Expands to the value of the drain timeout, as defined in the fleet. |
${unresponsive_timeout} | Expands to the value of the unresponsive timeout, as defined in the fleet. |
${artifact_path} | Expands to the value of the absolute path of an artifact directory that will get recursively collected. |
Sampling rules
Sampling rules tell AMS when to collect logs, custom artifacts, and core dumps for your dedicated servers managed by this fleet. Sampling rules are defined by artifact type and dedicated server exit status.
There are three configurable rules:
- Percentage of logs and custom artifacts to collect for dedicated servers that exit with a status of 0 (success)
- Percentage of logs and custom artifacts to collect for dedicated servers that exit with a status > 0 (failure)
- Percentage of core dumps to collect for dedicated servers that exit with a status > 0 (failure)
The Enable Log Sampling section of the UI applies to both Logs and Custom Artifacts. The Enable Artifacts Sampling section of the UI only applies to Core Dumps so only the abnormal exit sampling rate is applicable. We are aware this is confusing and will fix the UI in an upcoming release.
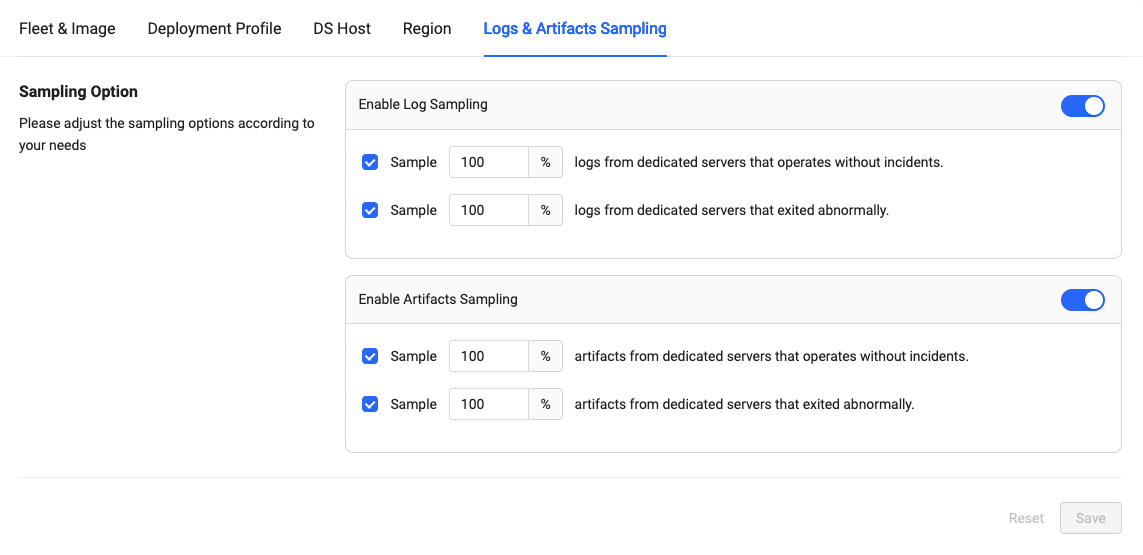
The value of each rule defines the percentage of dedicated servers for which artifacts will be collected. For example, a sampling value of 100 tells AMS to collect artifacts for all dedicated servers belonging to the fleet, whereas 50 means that AMS will collect artifacts from roughly half of the dedicated servers.
Setting the sampling percentage to zero tells AMS to report all matching artifacts, but not actually collect and store them for you to retrieve.
Sampling rules can also be deactivated, effectively disabling the sampling rule, which means AMS will not even report artifacts matching the rule.
To view and manage the collected artifacts from your dedicated servers using the Admin Portal, see the View and manage dedicated server logs and artifacts article.