Upload a dedicated server build
Armada is deprecated, replaced by AccelByte Multiplayer Servers (AMS), our next-generation dedicated server orchestration product. AGS Premium customers can ask your AccelByte account team about enabling AMS for your environments.
Armada is not available on AGS Starter tier, use AMS instead.
Overview
Armada can be configured to automatically distribute dedicated servers regionally, where these dedicated servers are run to serve game sessions. The first step is to upload the dedicated server build to Armada, so that Armada can containerize these dedicated server builds into images, in order to transport and replicate into the regional virtual machines that host the dedicated servers.
Goals
After you complete this guide, you should have an understanding of the following:
- How to setup the correct permissions to use the dedicated server uploader
- How to download the dedicated server uploader
- How to generate an upload command
- The options of the uploader, such as --artifact, --debug-enabled and --no_symbol
- How to troubleshoot problems with the uploader
Prerequisites
Before you begin this guide, you should complete the following:
Set up an IAM client for dedicated servers, with the following permissions. You can follow this guide to set up your IAM client.
Permission name Action NAMESPACE:{namespace}:DSM:CONFIGRead NAMESPACE:{namespace}:DSUS:IMAGECreate, Read NAMESPACE:{namespace}:DSM:SERVERCreate, Update NAMESPACE:{namespace}:DSUS:CONFIGCreate :::note Best practice Create an API client specifically for dedicated server uploading. :::
You have access to the Admin Portal and the Namespace for your game.
You have prepared a dedicated server executable that is built on Linux.
You have put the dedicated server executables alongside any supporting files within a folder.
The dedicated server is built in either x84 or x64. ARM is not supported.
The Upload and Build Process
Armada uses a number of AWS services to facilitate the upload and build process.
- The dedicated server uploader uses the S3 sync command, to synchronize your local dedicated server uploader folder with a directory in an S3 bucket that is assigned to your environment. If the S3 directory already exists when synchronization happens, the sync command will only upload changes, to speed up the process.
- Once the synchronization is completed, the dedicated server uploader service kick starts a dedicated server builder process, to build the dedicated server into a containerized image.
- When the building process is completed, the resulting image is stored in a centralized elastic container registry, ready to be downloaded by virtual machines to spin up dedicated servers.
Using the Dedicated Server Uploader
The first step is to download the utility.
To Download the Dedicated Server Uploader
The latest version of the dedicated server uploader is available to be downloaded directly from the admin portal, by following these steps:
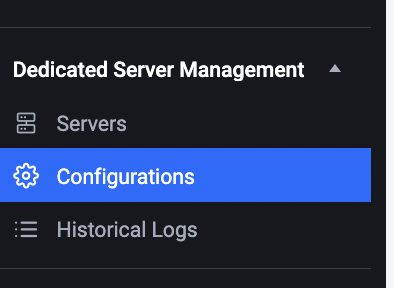
Click the Configuration button that is located under Dedicated Server Management, on the side menu bar.
Scroll all the way down in the content page to find the Upload Instruction button on the right hand side of the screen.
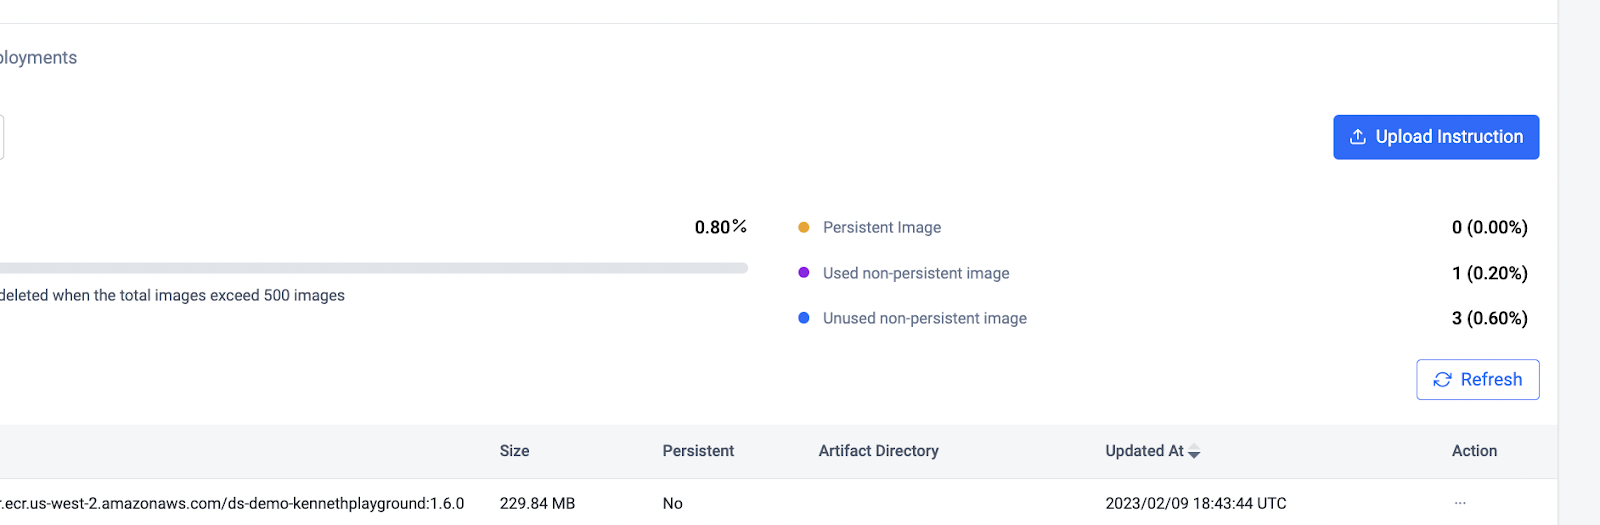
Click the Upload Instruction button.
You are offered a choice of downloading the dedicated server uploader for the Windows or Linux platforms. Note the version number of the uploader under the download buttons.
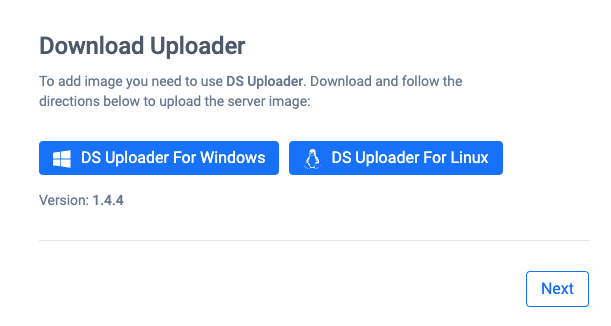
Download the latest DS Uploader after every ASG environment update.
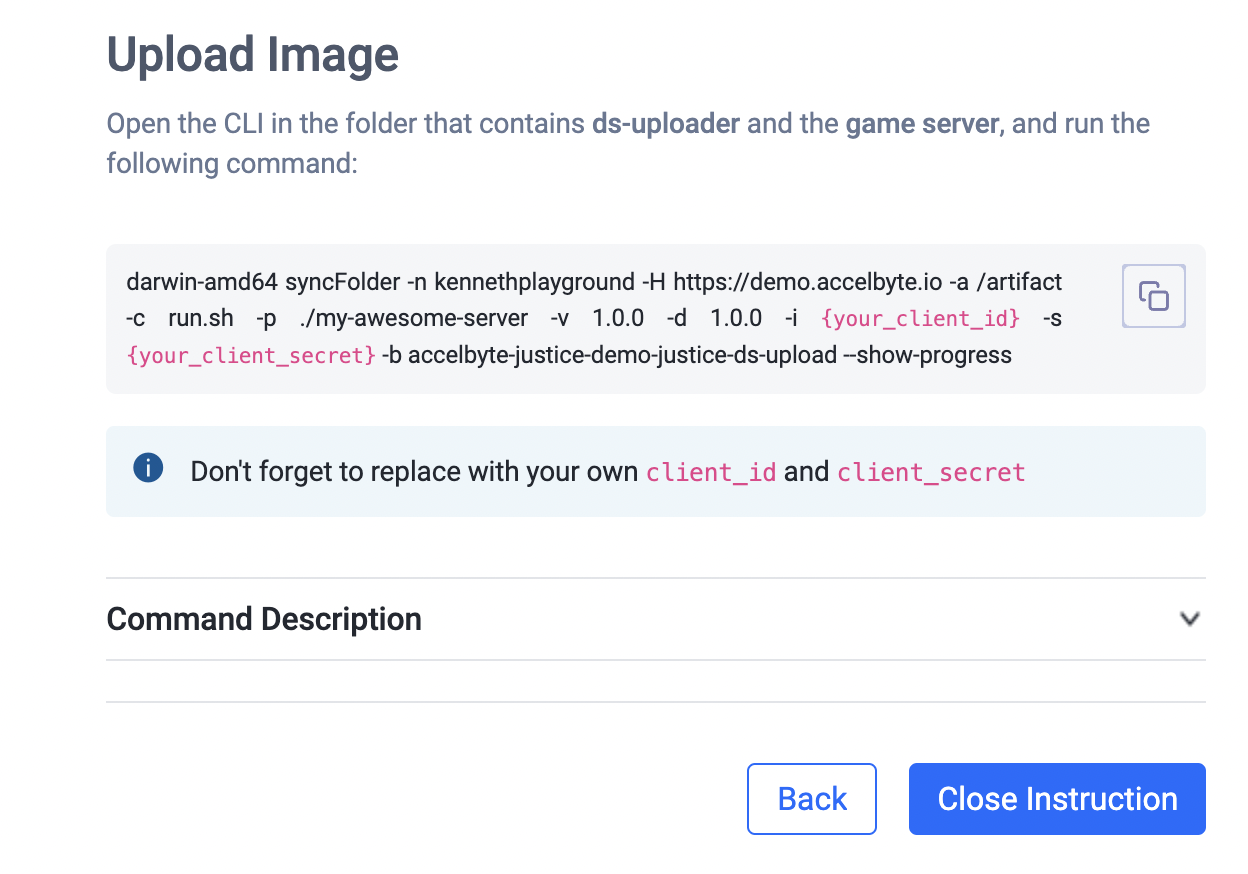
When you have downloaded your uploader, click Next to generate the command that you will use to upload your dedicated server.
Generate an Upload Command
Here is the generate command form. Fill in the fields appropriately.
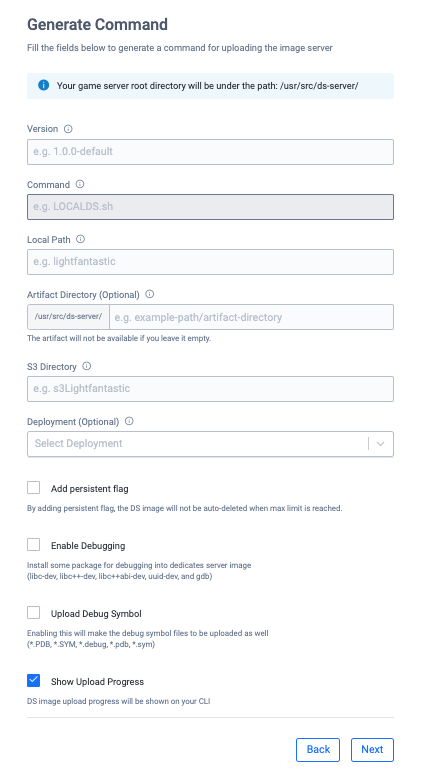
- Version: your version will need to be unique among all other dedicated servers that have been uploaded to the namespace.
- Command: specify the executable command to run your dedicated server.
- Local Path: specify the folder that you want to upload. Use either a path relative to where you store your uploader executable, or an absolute path to the folder.
- Artifact Directory: an optional parameter to specify where you want to store your artifact files. This is a path starting from the root folder of your dedicated server folder.
- Files that are stored in the artifact directory can be retrieved from the admin portal after the dedicated server has completed its life cycle.
- S3 Directory: the folder used to store your dedicated server files within the dedicated S3 bucket.
- Deployment: an optional parameter to enable you to directly update a deployment with this newly uploaded version of a dedicated server.
- Add persistent flag: check this option if you want to preserve your dedicated server through the automatic server clean up process.
- Note that servers that are in use by a deployment, or marked as persistent, will not be removed.
- Enable Debugging: check this option if you want some support libraries for debugging to be installed within the container that runs your dedicated server image. These libraries include:
  - libc-dev
  - libc++-dev
  - libc++abi-dev
  - uuid-dev
  - gdb
Only enable debugging on a development build. The additional libraries will enlarge the size of your dedicated server, so takes longer to load.
- Upload debug symbol: check this option if you want to upload the debug symbols generated by your compiler, so that stack traces on your Armada hosted dedicated servers can be readable.
Only enable upload debug symbols on a development build. Symbols are notoriously big in size, it will have an impact on the performance of the dedicated servers.
- Show upload progress: check this option if you want to see the progress of your upload.
When satisfied with the parameters you have entered, click the Next button to get your command. Then in the next page, you can copy the command to your clipboard by clicking the Copy button, which is next to the command.
Using the Dedicated Server Uploader Directly
If you have already downloaded the dedicated server uploader from the AccelByte admin portal, you can construct your own upload command without using the command generation feature from the admin portal. The general barebone command would be similar to:
```cs
> darwin-amd64 syncfolder -n <namespace> -H <base_url> -c <command> -p <upuload_folder_path> -v <version_string>, -d <s3_bucket_directory>, -i <client_id> -s <client_secret_if_confidential> -b <s3_bucket_name>
```
More help is available directly in the dedicated server uploader to build your command. To access the help menu, simply use the help command. Then the following options will be shown to you:
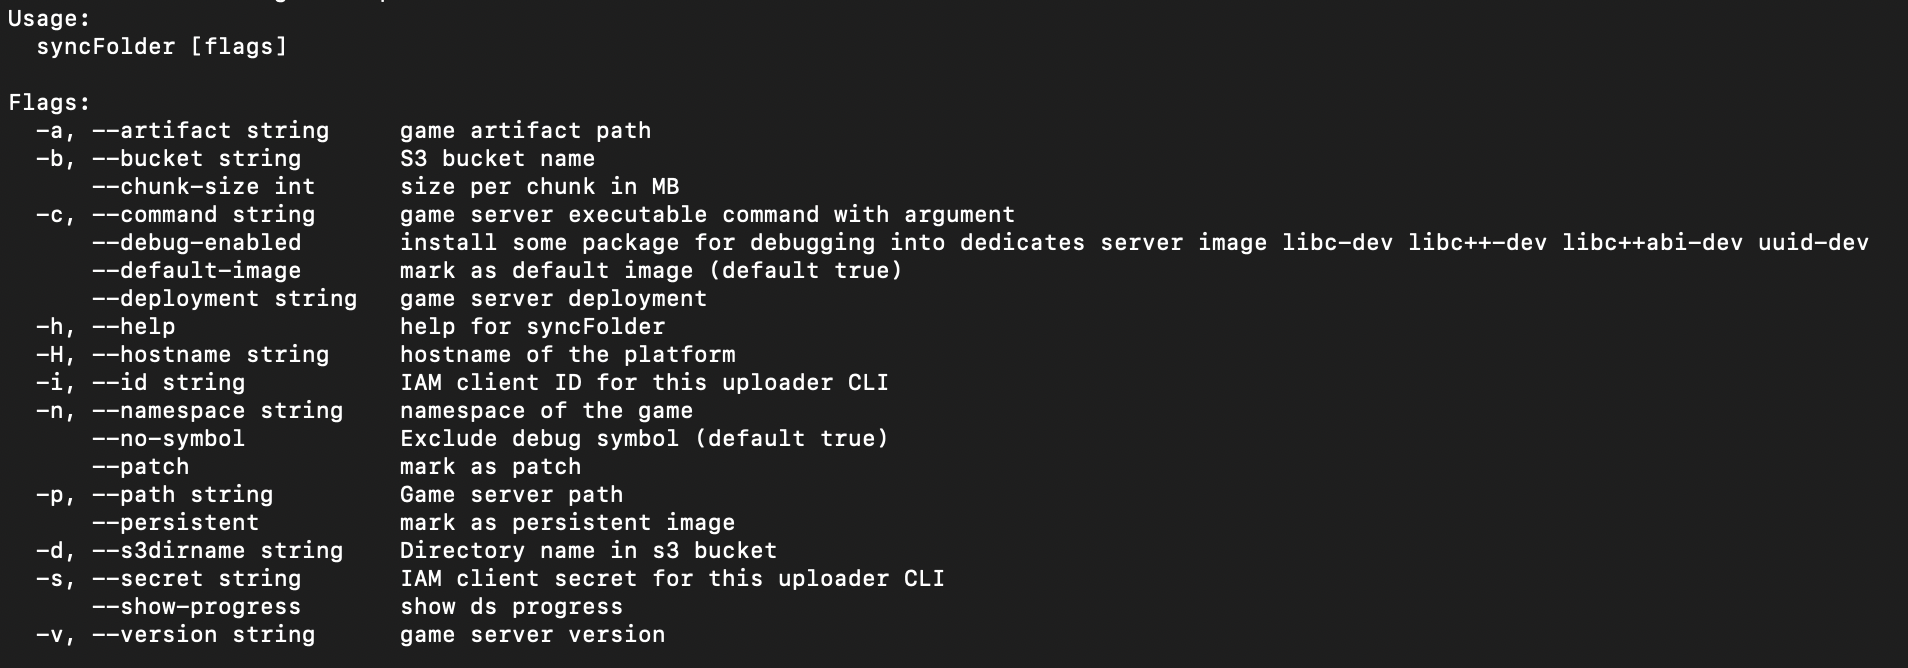
Command Flags
-b, --bucket
The S3 bucket name that the dedicated server will be uploaded to. Consult your DPM on what your S3 bucket name should be. Alternatively, the value is prefilled by using the Admin Portal upload command generator.
-c, --command
Specify the executable command to run your dedicated server.
-H, --hostname
Specify the host name of the environment that you want to upload to. The host name is the base url of the environment.
-i, --id
Specify the IAM client ID to be used for the uploader to authenticate.
-n, --namespace
Specify the namespace where the dedicated server will be uploaded to.
-p, --path
The local path to where your dedicated server to be uploaded is located.
-d, --s3dirname
Specify in what folder you want to store your dedicated server files within the S3 bucket.
-s, --secret
Specify the IAM client secret to be used for the uploader, to authenticate if the IAM client in use is a confidential client. Otherwise this option can be skipped.
-v, --version
Specify your version, the version will need to be unique among all other dedicated servers that have been uploaded to the namespace.
-a, --artifact (Optional)
The artifact path that is to be used by the dedicated server. The artifact path will be prefixed by /usr/src/ds-server/.
--chuck-size (Optional)
Define the chunk size in MB. You may want to use a smaller chunk size under a slow network to reduce errors during upload.
--debug-enabled (Optional)
Use this option if you want some support libraries for debugging to be installed within the container that runs your dedicated server image. These libraries include:
- libc-dev
- libc++-dev
- libc++abi-dev
- uuid-dev
- gdb
The default value is false. Use --debug-enabled to include the debug libraries.
--default-image (Optional)
This will specify the uploaded server as the default image, to be used by Armada's deployments to spin up dedicated servers.
--no-symbol (Optional)
Specify if you want debug symbols to be uploaded alongside the dedicated server. The default value is true (so, no symbols will be uploaded). Use --no-symbol=false if you do want to upload symbols.
--patch (Optional)
The patch option allows you to upload a dedicated server image using an existing image version. This ensures you don't have to make any modifications to your deployment or matchmaking ruleset. Use this option if you want to have a zero downtime image upgrade.
The newer version of the server will only be available on any newly created dedicated server. Any existing dedicated server will not be upgraded.
--persistent (Optional)
Treat the dedicated server as persistent. A persistent server will not be deleted by the automated server cleanup daemon.
--show-progress (Optional)
Specify if you want the progress log to be emitted by the uploader during upload. The default value is false. Use --show-progress if you want to see the progress logs.
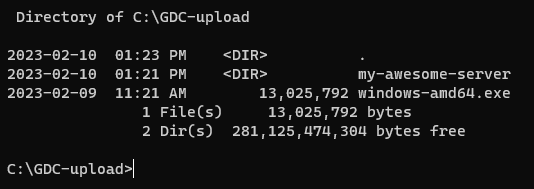
Upload your Dedicated Server
Finally, open up a new terminal in your local computer, then navigate to the location where you store the dedicated server uploader.
Then paste the command into the terminal. Replace {your_client_id} and {your_client_secret} with the information from the IAM client you had created for server upload, then press enter. Your upload should start immediately.
If you are using a public IAM client, you can remove the -s {your_client_secret} from the command.
Troubleshooting
In this section, you can find common errors and issues that may occur when using the service, along with recommendations on how to resolve them.
Error: “errorCode”: 401, “errorMessage”: { “error”: “invalid_client”, “error_description”: “unable to generate token: unable to handle request”}
This is because the dedicated server uploader is unable to get authenticated by the ASG IAM service, to receive a JWT token. Check if you have the correct client_id and client_secret in the upload command.
Error: “errorCode”: 2013, “errorMessage”: “access forbidden: Insufficient permissions”
This is caused by your IAM client having insufficient permissions. Check the following:
- You are using the correct IAM client credentials.
- The namespace that the IAM client you use to upload is the namespace that you specified in the -n or --namespace parameter in your upload command.
- The IAM clients in use have the following permissions:
| Permission name | Action |
|---|---|
NAMESPACE:{namespace}:DSM:CONFIG | Read |
NAMESPACE:{namespace}:DSUS:IMAGE | Create, Read |
NAMESPACE:{namespace}:DSM:SERVER | Create, Update |
NAMESPACE:{namespace}:DSUS:CONFIG | Create |
Error: “docker file pushed to registry but unable to update DSM config. Please contact the Administrator”
This is caused by using an outdated dedicated server uploader. Download the newest version of the dedicated server uploader from the Admin Portal.
Error: “unable to create image patch, invalid request: patch version is empty”
This is caused by using an outdated dedicated server uploader. Download the newest version of the dedicated server uploader from the Admin Portal.
Error: “conflict image version”
This is caused by using an image version that has already been used by another uploaded server image. If you want to keep using the same version, you can add the --patch flag to your command. Otherwise use a unique image version to create a new image entry.
You have some dependent libraries that need to be installed for your server to work
Please make a request to your AccelByte Technical Producer.