Deep dive into advanced configuration
Armada is deprecated, replaced by AccelByte Multiplayer Servers (AMS), our next-generation dedicated server orchestration product. AGS Premium customers can ask your AccelByte account team about enabling AMS for your environments.
Armada is not available on AGS Starter tier, use AMS instead.
Overview
In this article, we delve into a range of advanced configuration features that are closely tied to deployment, allowing you to optimize and tailor your deployments to perfectly align with your specific needs.
Goals
After you complete this guide, you should have an understanding of:
- When and how to use override version.
- When and how to use override deployment.
- When and how to use override regions.
- Using extendable sessions.
- How to request for information about your environment and make changes to them.
- How to request for additional regions.
Prerequisites
Before you begin this guide, you should have:
- Integrated a dedicated server with the AGS server SDK.
- Created a dedicated server that is able to register with Armada after it finishes loading game assets.
- Access to the AGS Admin Portal and the namespace for your game.
- Uploaded a dedicated server to Armada.
- Finished configuring your Armada environment.
- Created a deployment.
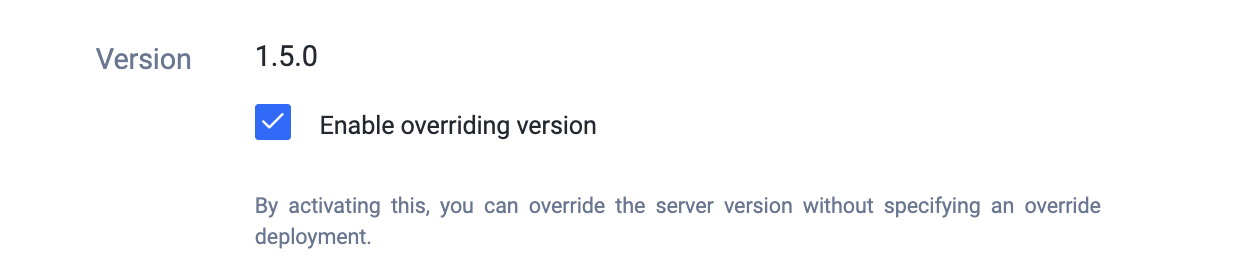
Override version
By enabling override version, you can override the server version without specifying an override deployment. To do so, simply check the Enable overriding version checkbox in a deployment details page.
Override deployment
By utilizing the override deployment option, you can create supplementary deployments within a single deployment, allowing you to efficiently manage all deployments for your game within one unified section.
To create override deployments:
Navigate to the deployment details page, then scroll down to the bottom to locate the "+" button beside Override Deployment.
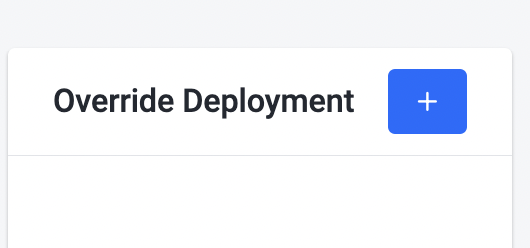
Click the "+" button to open the override deployment configuration popup.
Fill in the override deployment details, just like you would for a normal deployment and click the "Add" button when you finish.
Each override deployment will effectively function as deployment on its own.
Override regions
When the moment arrives to ready your game to accept external players -- whether it's for alpha/close beta, open beta, or live launch -- you would want to adjust the your deployments so that they have enough regional capacity to service your players.
To enable override region:
Navigate to the deployment details page, then scroll down to the bottom to locate the "Override Region Configuration" checkbox.

Check the checkbox, then click the +Add button located in the Region section to open up the override region popup.
In the popup, select the Regions that you want to override, and then proceed to configure the Min. Count, Max. Count, and Buffer Type. Then click the "Add" button when you finish.
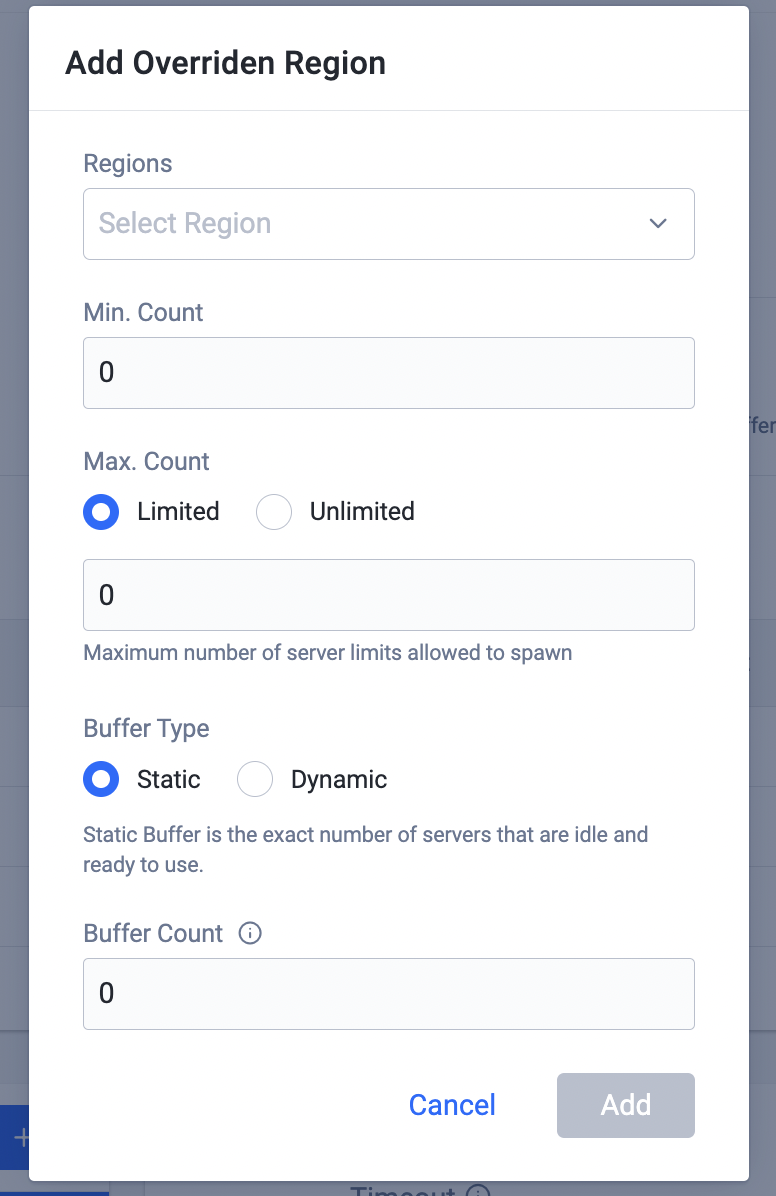
You can edit/remove your override region configuration in the region section.
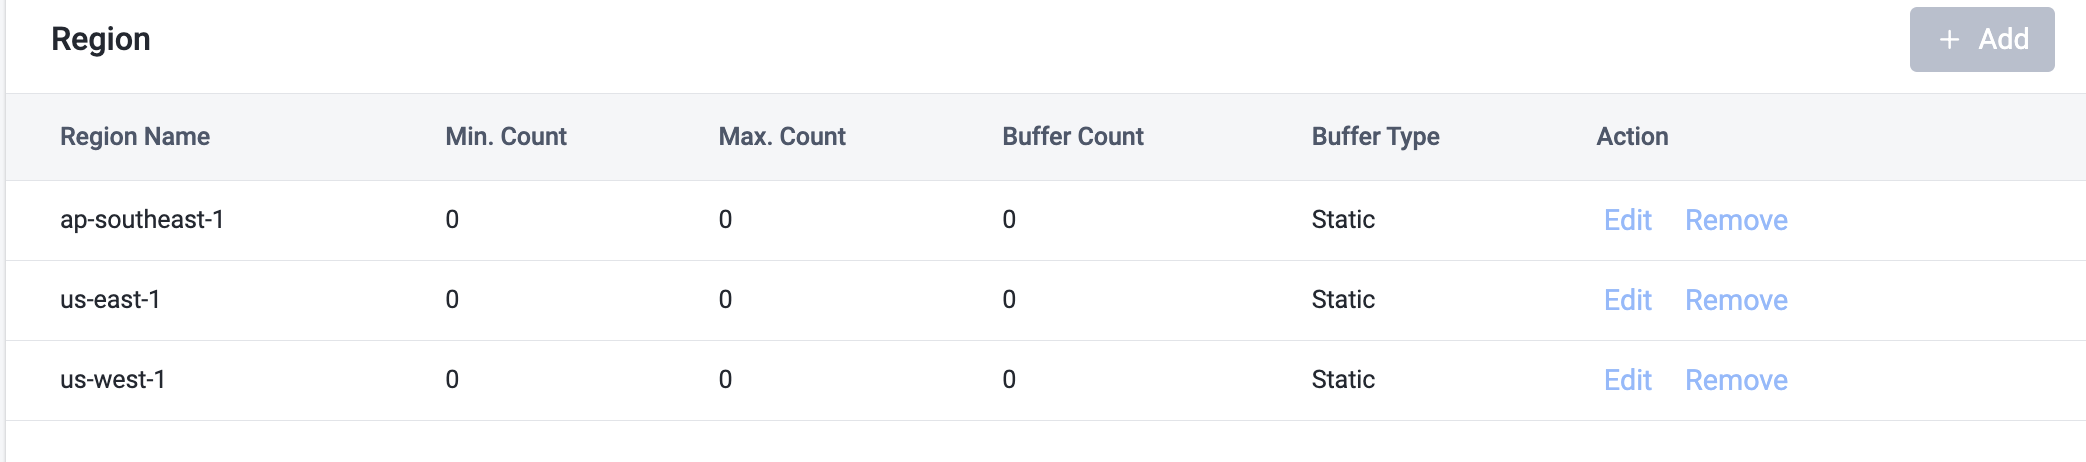
The override region configurations is only applicable to the root deployment.
Using extendable sessions
Extendable sessions allow dedicated servers to actively ask for more game session time before the session timeout kicks in to kill it. This feature is especially useful for games that require game servers to be hosted for an undetermined amount of time -- such as social hubs -- where players can hang out and trade.
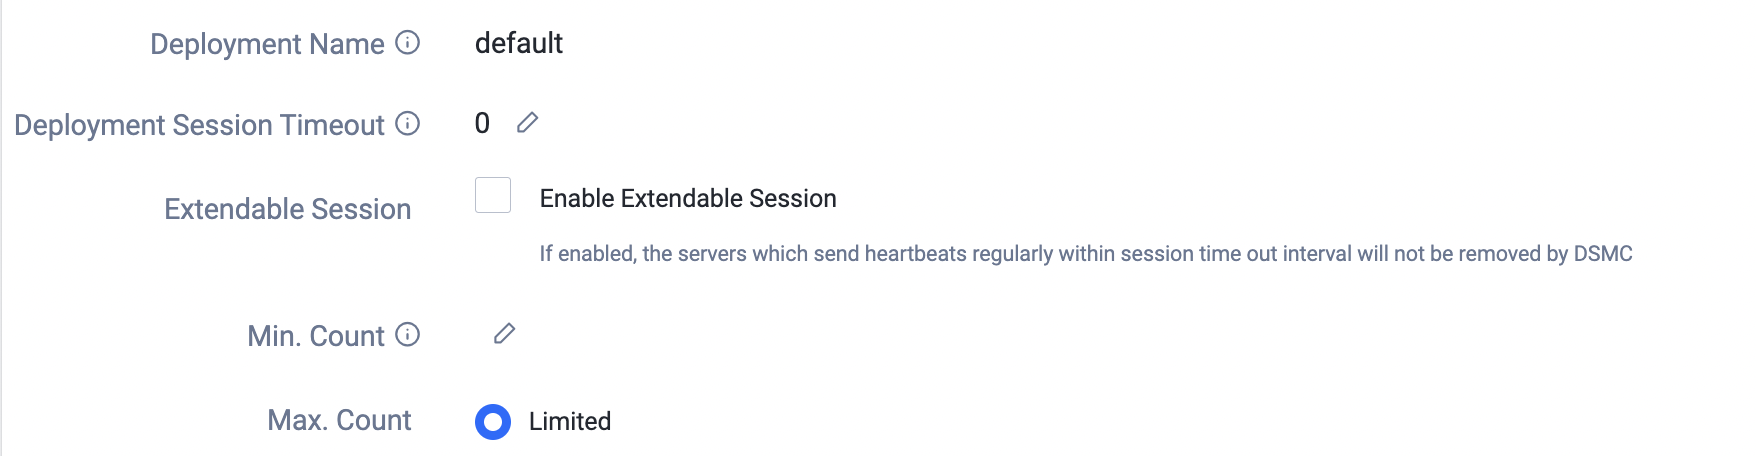
The feature will require activation on the deployment page before the extension request can be used. This can be done by simply checking the Enable Extendable Session checkbox in the deployment details page. Once extendable session is enabled for a deployment, the dedicated servers within the deployment can use the following APIs to manipulate the session timeout:
Each time the dedicated server requests an extension, the session timeout will be reset to 0. There is no limit on how many times an extension can be requested.
Get the session timeout, as configured on the AGS Admin Portal
- Unreal
- Unity
//Get server API client
FServerApiClientPtr ServerApiClient = FMultiRegistry::GetServerApiClient();
//
int32 SessionTimeout;
ServerApiClient->ServerDSM.GetSessionTimeout(
  THandler<FAccelByteModelsServerTimeoutResponse>::CreateLambda(
  [&SessionTimeout](const FAccelByteModelsServerTimeoutResponse& Result)
  {
    SessionTimeout = Result.Session_timeout;
  }), OnErrorCallback);
var dsm = AccelByteServerPlugin.GetDSM();
var sessionTimeout;
dsm.GetSessionTimeout(result =>
{
  if(result.IsError)
  {
    //error handle
    return;
  }
  sesisonTimeout = result.Value.SessionTimeout;
});
Start the session extension heartbeat with interval
- Unreal
- Unity
FServerApiClientPtr ServerApiClient = FMultiRegistry::GetServerApiClient();
uint32 HeartbeatPeriod = SessionTimeout / 2;
ServerApiClient->ServerDSM.StartHeartbeat(HeartbeatPeriod);
var dsm = AccelByteServerPlugin.GetDSM();
var heartbeatPeriod = sessionTimeout / 2;
dsm.SetHeartbeatEnabled(true, heartbeatPeriod * 1000);
Stop the session extension heartbeat
- Unreal
- Unity
FServerApiClientPtr ServerApiClient = FMultiRegistry::GetServerApiClient();
ServerApiClient->ServerDSM.StopHeartbeat();
var dsm = AccelByteServerPlugin.GetDSM();
dsm.SetHeartbeatEnabled(false);
Calling the session extension API directly
- Unreal
- Unity
FServerApiClientPtr ServerApiClient = FMultiRegistry::GetServerApiClient();
ServerApiClient->ServerHeartbeat(OnSuccessCallback, OnErrorCallback);
var dsm = AccelByteServerPlugin.GetDSM();
dsm.ServerHeartBeat(result =>
{
  if(result.IsError)
  {
    //error handle
    return;
  }
  //success handle
});
Request for information about your environment and make changes to them
For detailed information about your environment, please reach out to your technical producer. The AccelByte team will collaborate with you to tailor your environments to suit your specific requirements.
Request for additional regions
If you require support for additional regions in your environment, please contact your technical producer. They will assist you in expanding the region support to meet your needs.