Set up, configure, and prepare a store
Overview
In this document you will learn how to create a Store, configure a Store, and create items. This will enable you to sell items, using real or virtual currencies.
Prerequisites
- Access to the AccelByte Gaming Services (AGS) Admin Portal.
- Appropriate namespaces are created.
Key Concepts
Stores can exist in both Publisher namespaces and Game namespaces. More details on the difference between these two namespaces can be found here Namespaces. We recommend that game-specific items be configured in a Game namespace since a Publisher namespace is usually used as a publisher storefront for your game, and Downloadable Content (DLC) distribution. A Publisher namespace is more useful if you are setting up an AccelByte Gaming Services (AGS) Player Portal and launching your games using our Launcher, since you can manage sales of your games in them.
An overview of functionalities of a Store can be found in the Store introduction.
Item types
Before you start setting up a Store, it is important to know all types of items supported in our Store. Currently, items set up in the Publisher namespace are not accessible in a Game namespace and vice versa. There are several types of items you can create.
Both Game and Publisher namespaces
- **In-Game Item**: a durable or consumable item used by players in-game. Before you can create in-game items, you will need to register an App with the Game type in your store.
- **Bundle**: a package containing one or more items from your store combined into a single purchasable item. You must create at least two items before you can make a bundle.
- **Coin**: credit that can be used to top up a player's virtual currency wallet.
- **Code**: used by players to redeem apps, in-game items, bundles, etc.
- **Media**: items such as music, exclusive art, etc.
- **Option Box**: contains a list of other items. Players can choose one item to keep when opening an option box.
- **Loot Box**: contains a list of other items that have individual probabilities for appearing when a loot box is opened.
- **Extension**: can be used with custom services to allow players purchase and fulfill custom items Extensions can currently only be created via the API.
Game namespaces only
- Season: a limited-time-only event that uses passes and tiers to engage participating players. For more information, see Season Pass.
Publisher Namespaces only
The App and Subscription item type are not available on AGS Starter tier.
- App: Used for application items such as games, demos, DLC, etc.
- Subscription: Used to create a subscription package.
Items from Publisher namespace can be granted to players, however, in some other services, like Reward service, only Game namespace items can be granted while virtual currencies from both Game and Publisher namespaces can be granted to players even in Reward service.
Manage a Catalog in the Admin Portal
Create a Store
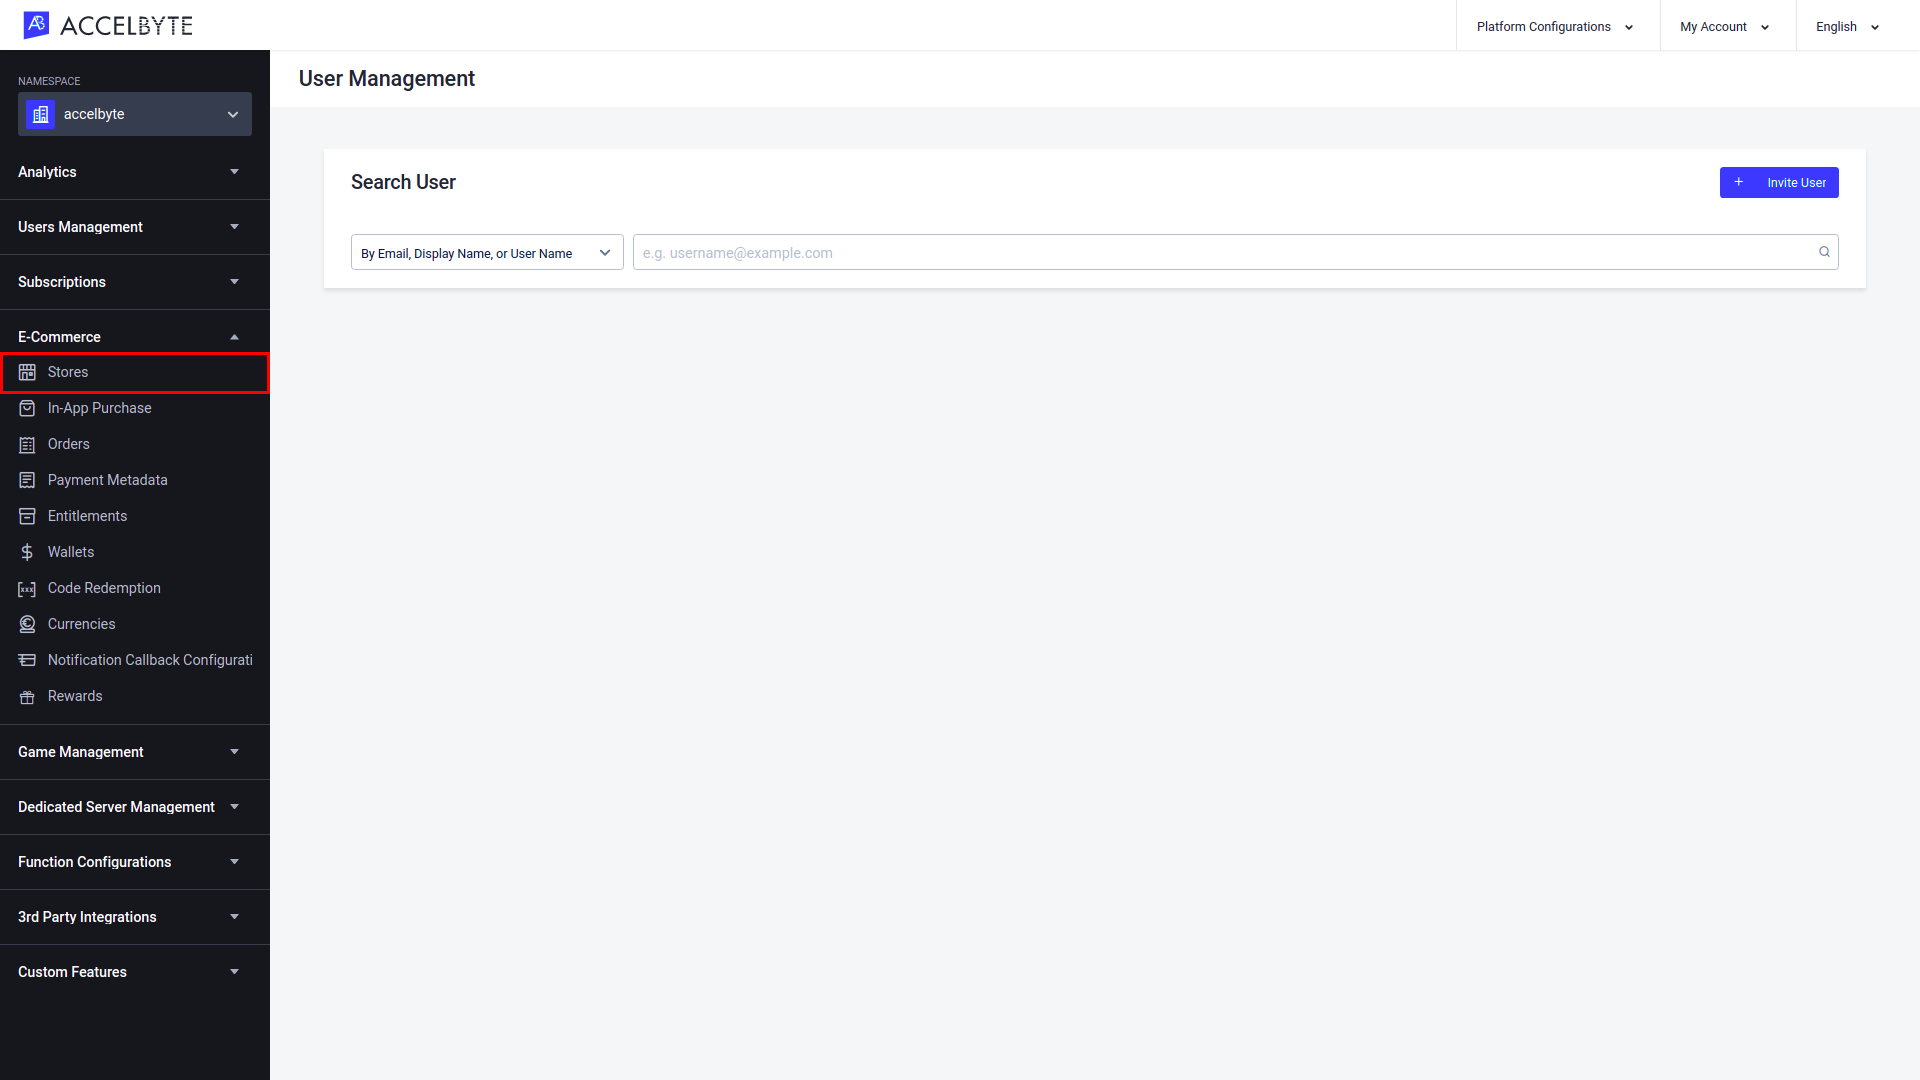
In the Admin Portal, go to the Commerce section and click the Stores menu.
On the Stores page, go to the Draft Store section and click the Create Draft Store button.
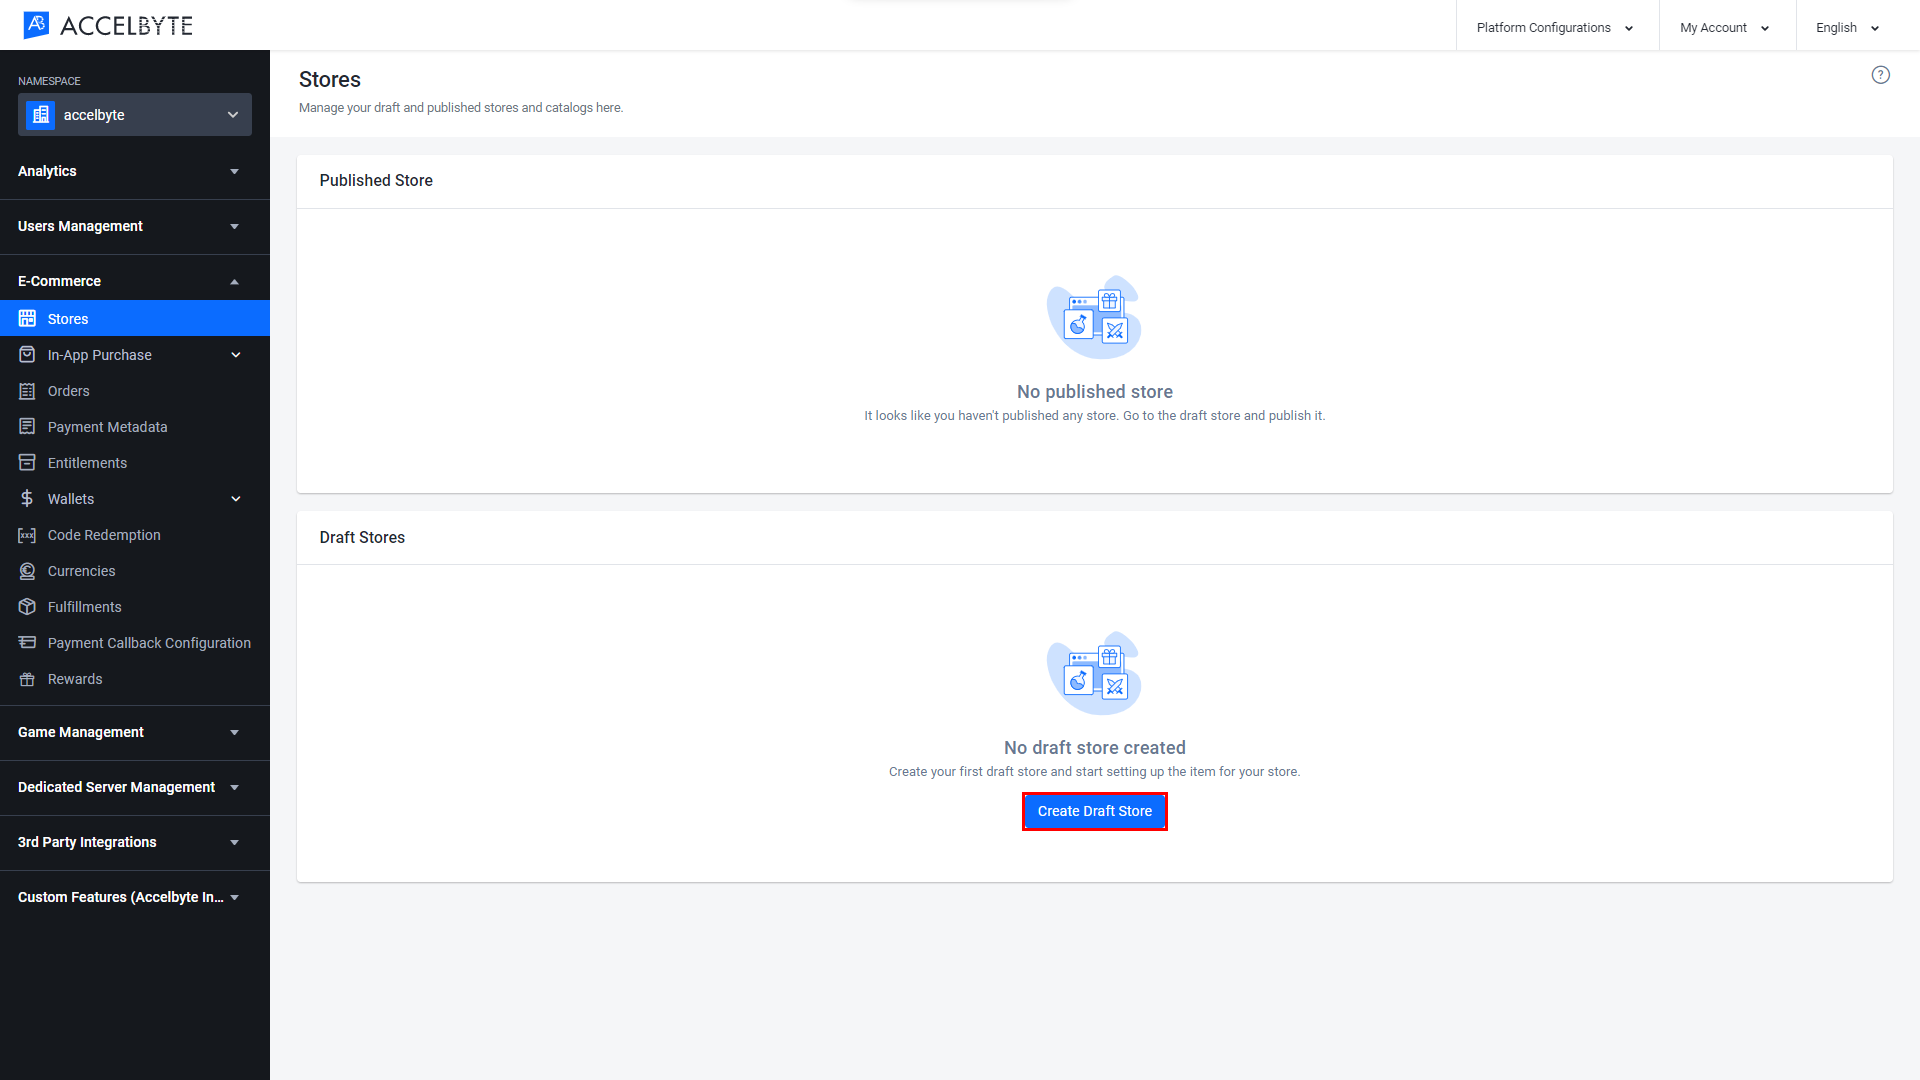 note
noteYou can only have one draft store.
A form appears. Fill in the required information.
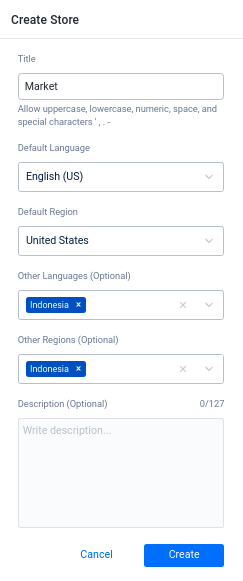
- Input your store Title. The store title will be visible in the Launcher and Player Portal as your store name.
- Select the Default Language.
- Select the Default Region.
- Select the Other Languages supported besides the default language, if desired.
- Select the Other Regions supported besides the default region, if desired.
- Input a Description for your store.
When you're done, click Create.
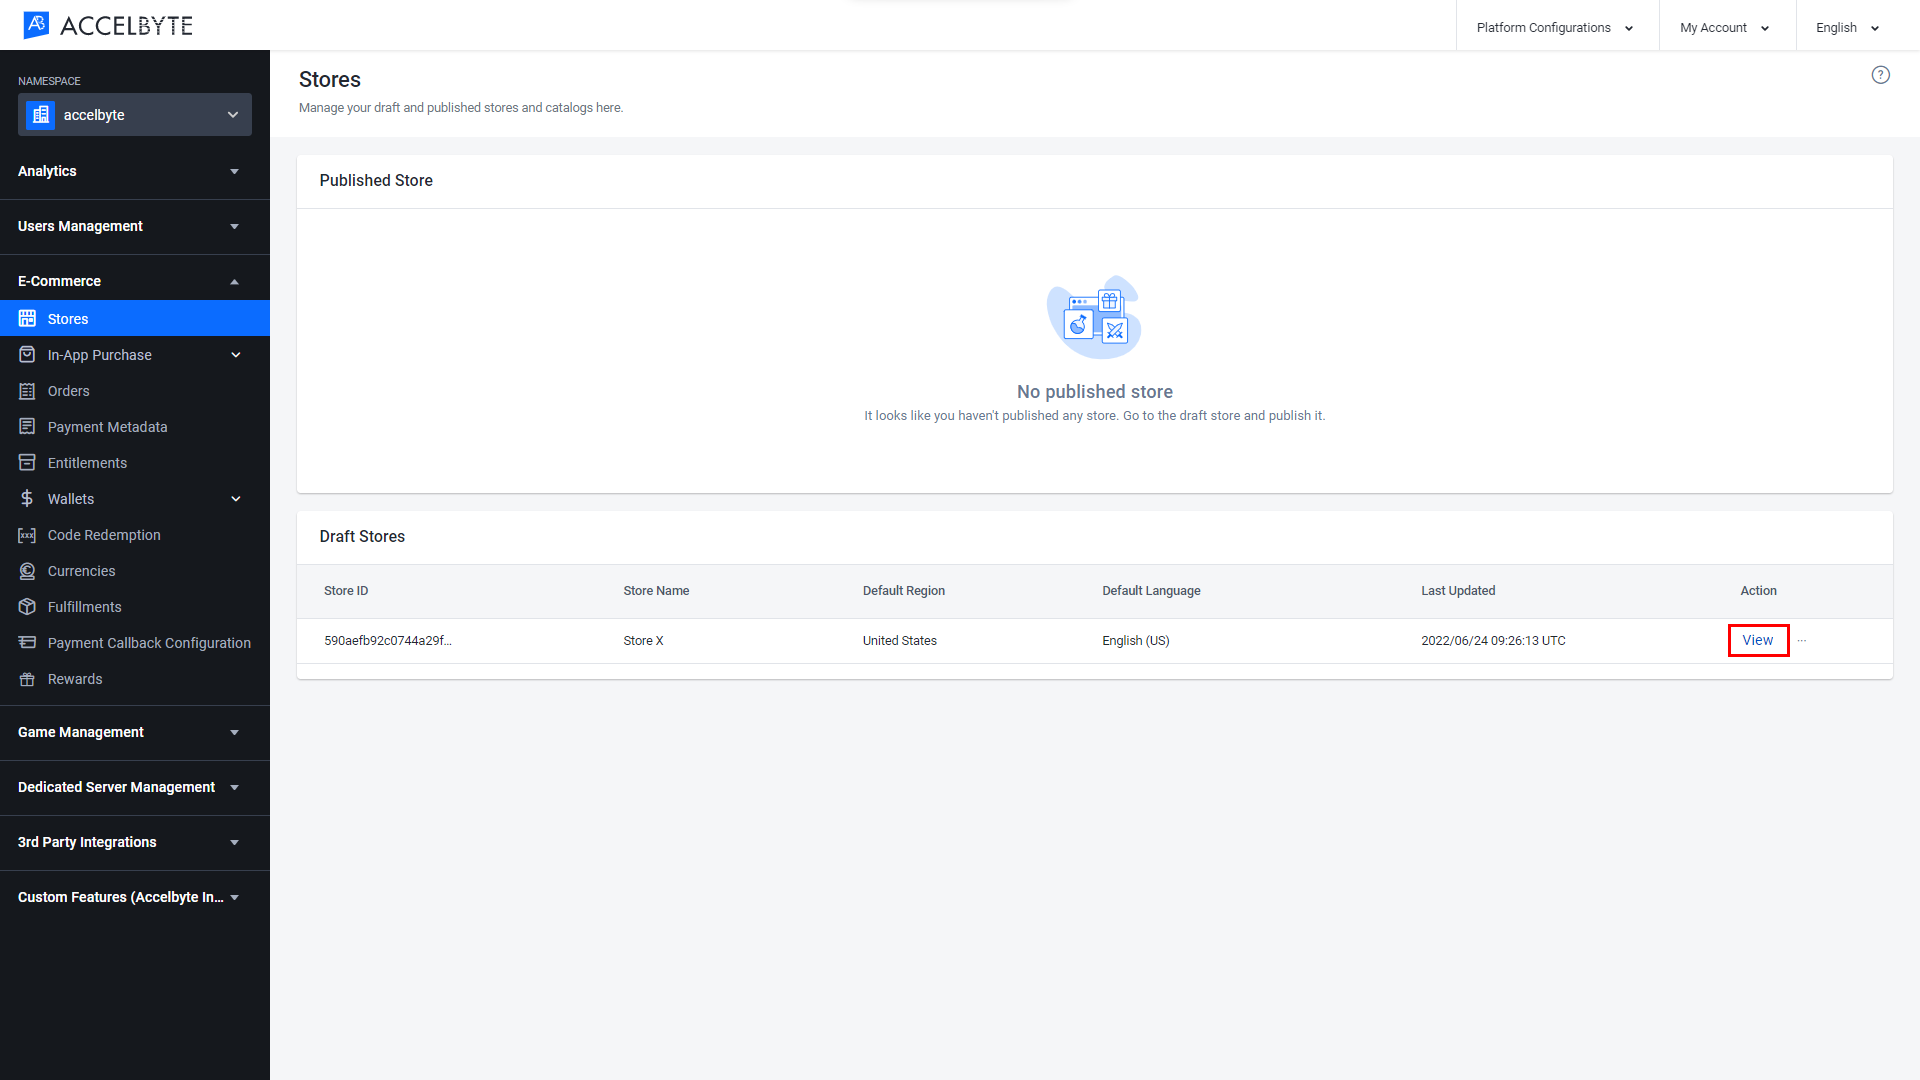
The draft store appears on the Stores page. The next thing you need to do is add item categories and items to your store.
Create a Category
Creating a category is useful for you to organize the items from your store into groups.
In the Draft Store, click View to add categories.
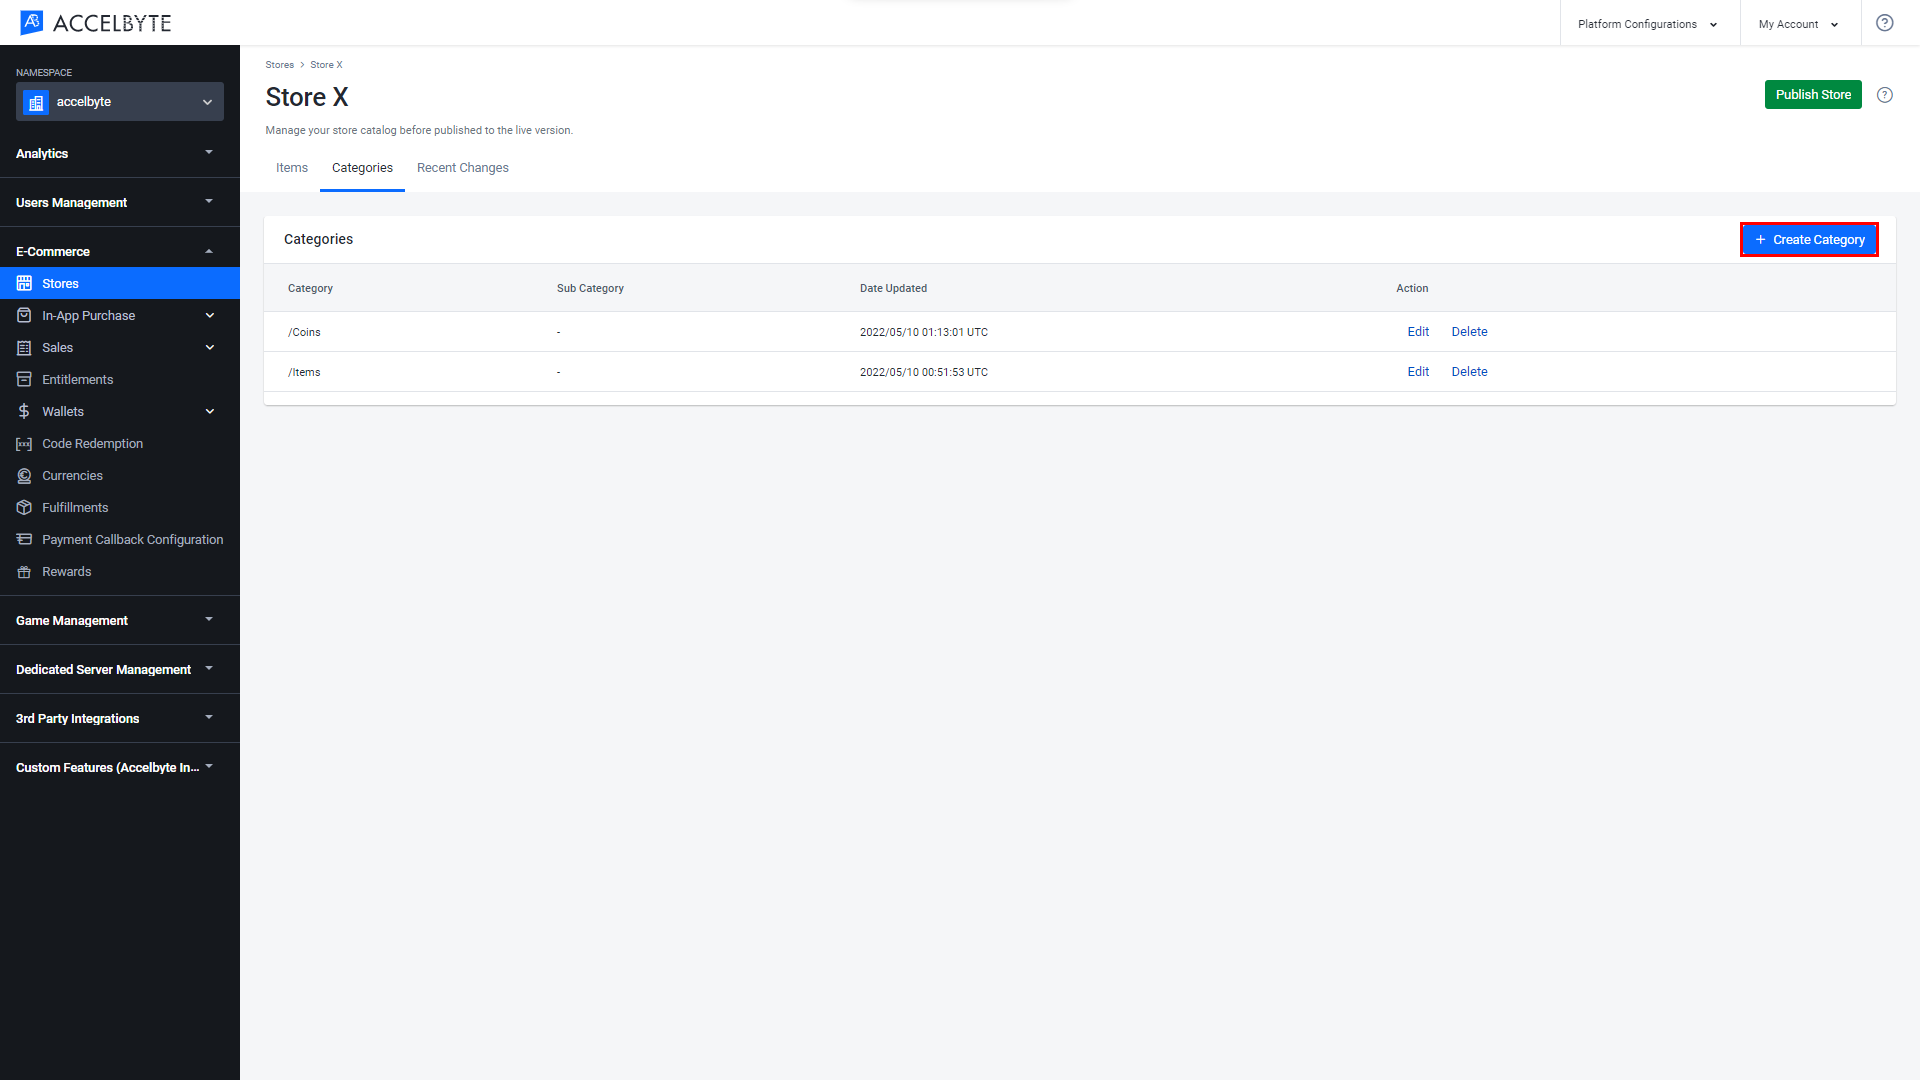
In your draft store, open the Categories tab, and click the Create Category button.

The Create Category form appears and you need to fill in the required information.
- Insert a Name for the category that also serves as the item path. Add “/” before the item to follow the format requirement. For example, /character.
- Choose the Parent Category from the dropdown if you want to make this category a sub-category of a previously made category.
When you're done, the new category will be added to the list.
Changes you make inside the store will not take effect until the store is published.
Create an Item in a Store
In your store page, go to the Items tab and click the Create Item button.

The Create Item form will appear.

Choose the type of item you want to create in the Item Type field. For a list of the available item types, you can refer to the Item Type section earlier in this guide. Note the differences described there between a Publisher Namespace store and a Game Namespace store.

Fill in the Basic Information field group:
- Item Name: input the name of the item.
- Category: assign the item to a category that you created earlier.
- Required Game: the game your item will be associated with.
Item Type: App (Publisher Namespace Only)
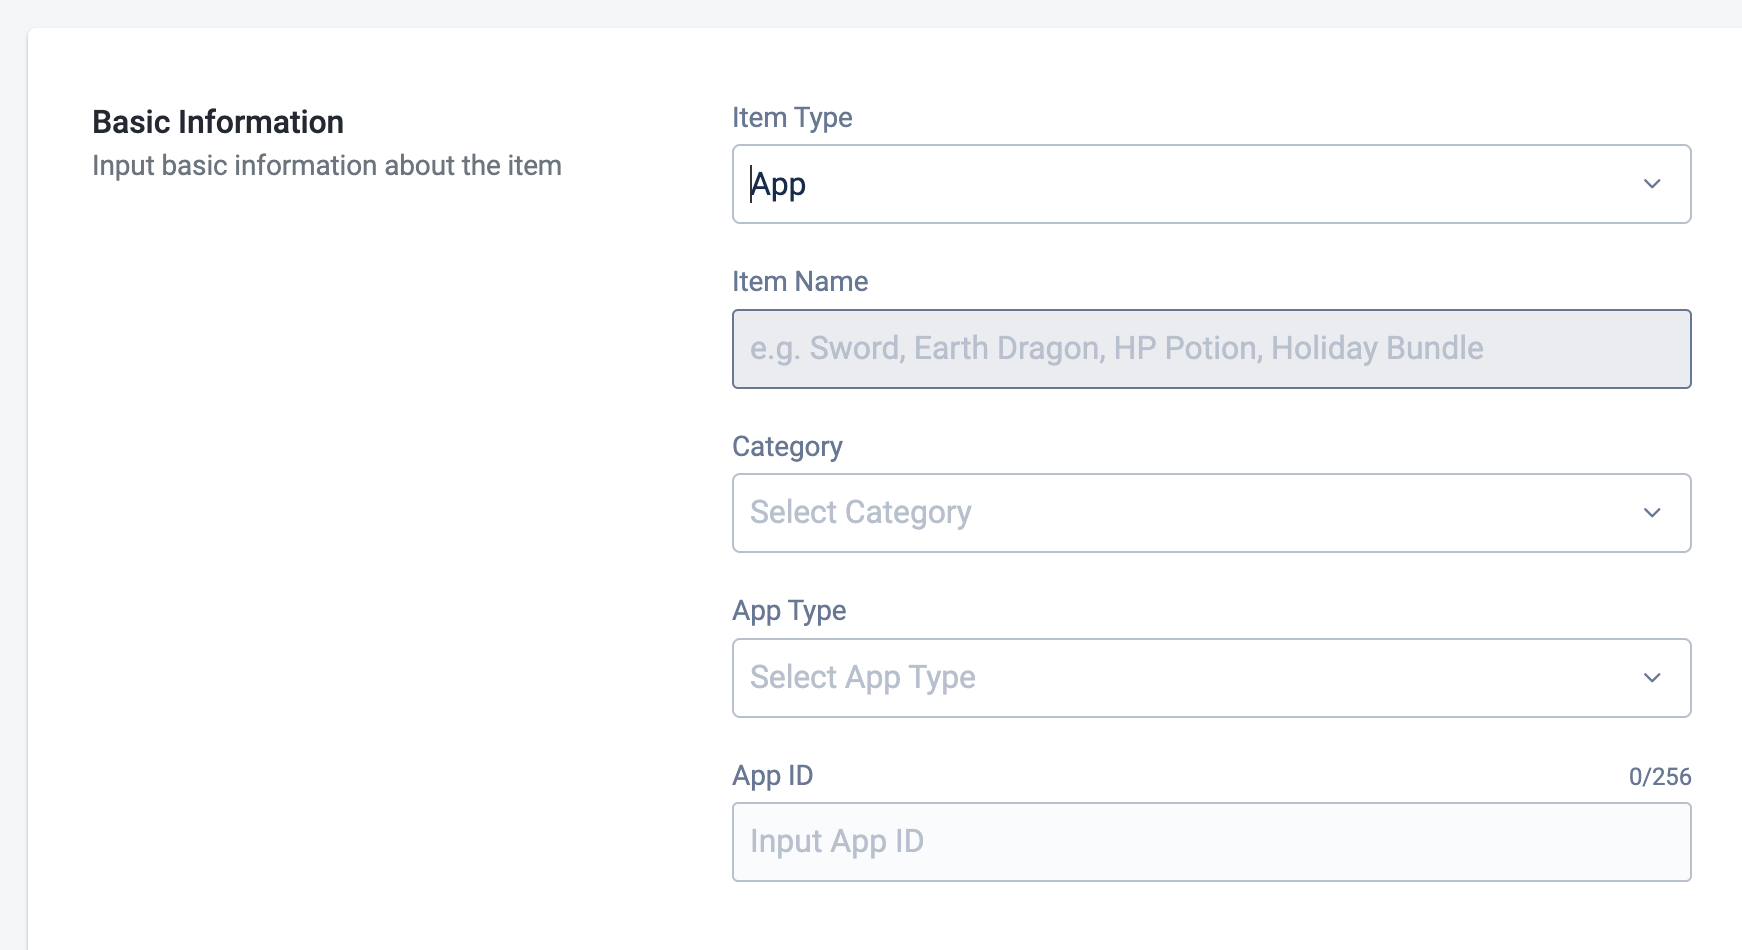
- App Type: choose the type of the App: Demo, DLC, Game, Software
- App ID: this is a unique identifier made up of alphanumeric characters, and is used to identify your game when you upload it.
noteYou can't change the App ID after it has been defined.
noteYou can only choose item type App in a Publisher Namespace store.
Item Type: Coin (Any namespace)
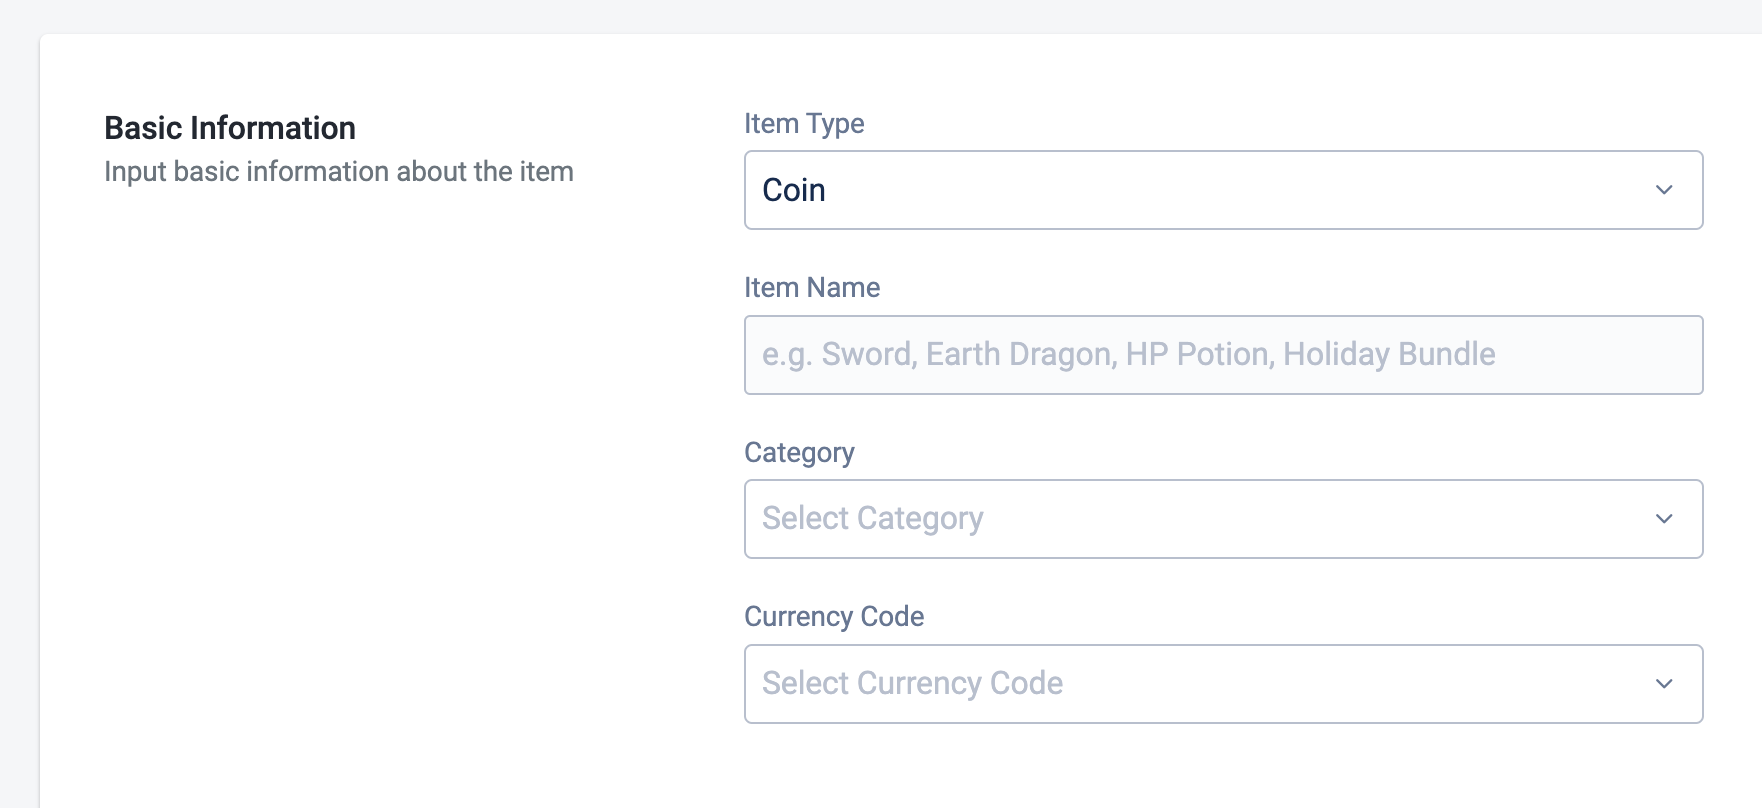
Currency Code: the currency code for the coin associated with the item.
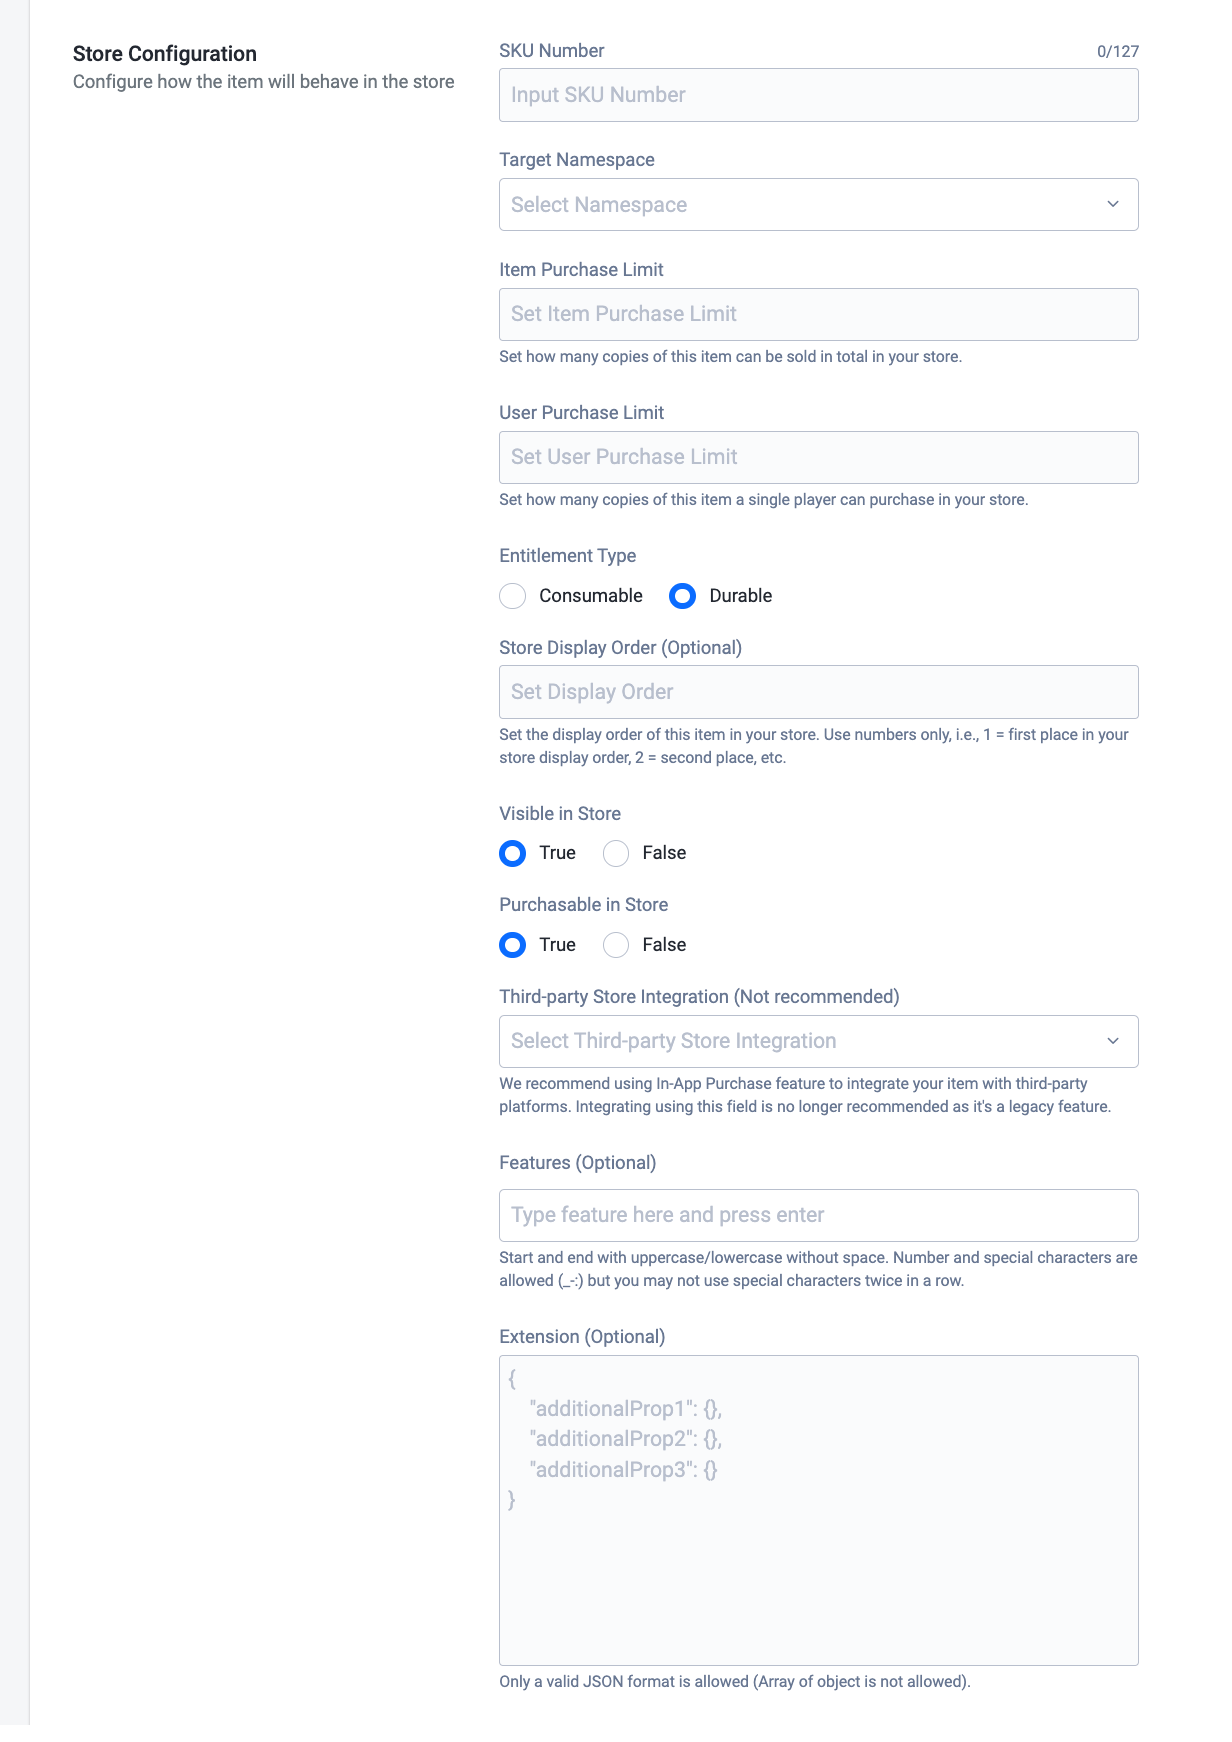
Fill the Store Configuration section:
SKU Number: assign a SKU number to the item.
Target Namespace: the game namespace where the item will be sold.
Item Purchase Limit: define the purchase limit of this item for your store. For example, if you set the item purchase limit to 100, this means that 100 units of that particular item will be available for purchase in your store. To make this value unlimited, input -1.
User Purchase Limit: define the purchase limit of this item for each account. For example, if you set the user purchase limit of this item to 100, this means that 100 units of that particular item will be available for purchase in your store, for each account. To make this value unlimited, input -1.
Entitlement Type: if your item is reusable, choose Durable. If your item is single-use, choose Consumable.
Follow these additional steps for Consumable items:
Set the Item Use Count to define how many times the item can be used.
Set the Stack Entitlement value. Set to True if the item should be stackable. If not, set to False.
Display Order: set the order in which the item will be displayed in the Player Portal among the item list.
Visible in Store: select True to make the item visible, or False to hide the item from your published store.
Purchasable in Store: select True to make your item available for purchase, or False to make it unavailable for purchase.
Use Case: Visible in Store and Purchasable in Store. There are three scenarios you can apply to Visible in Store and Purchasable in Store fields:
- Select True for Visible in Store and True for Purchasable in Store settings for items that you want to be immediately available for purchase in the store.
- Select True for Visible in Store and False for Purchasable in Store if you want to give a preview of the item to players but the item will be available at a later time.
- Select False for Visible in Store and True for Purchasable in Store to save items as drafts which can be worked on later.
Features: this field works like a tag. Use this field to include a feature of the item, for example, Christmas Special Edition, Summer Beach, Blinky Mushroom Era, etc. Each item can have more than one feature. So items can be freely grouped based on their assigned features. This field is optional.
Extension: Use this field to add further information to an item for custom usage. Must be written in a valid JSON format. For example, some special attributes like color, attack power can be defined using extension. An array of objects is not allowed.
Item type: Subscription (Publisher Namespace Only)
Fill in the Subscription Configuration section:
- Billing Cycle: How often subscribing players will be billed. You can choose to charge the user Weekly, Monthly, Quarterly, or Yearly.
- Grace Period: Give players extra time to pay in case of payment processing issues. The default setting is 7 days.
- Trial Plan: Choose between Free Trial, Paid Trial, or No Trial.
- If you choose Free Trial, enter the Trial Period Length in days.
- If you choose Paid Trial, enter the Trial Period Length in billing cycle units and set the Trial Price.
 note
noteThis item type can only be used in a Publisher Namespace store.
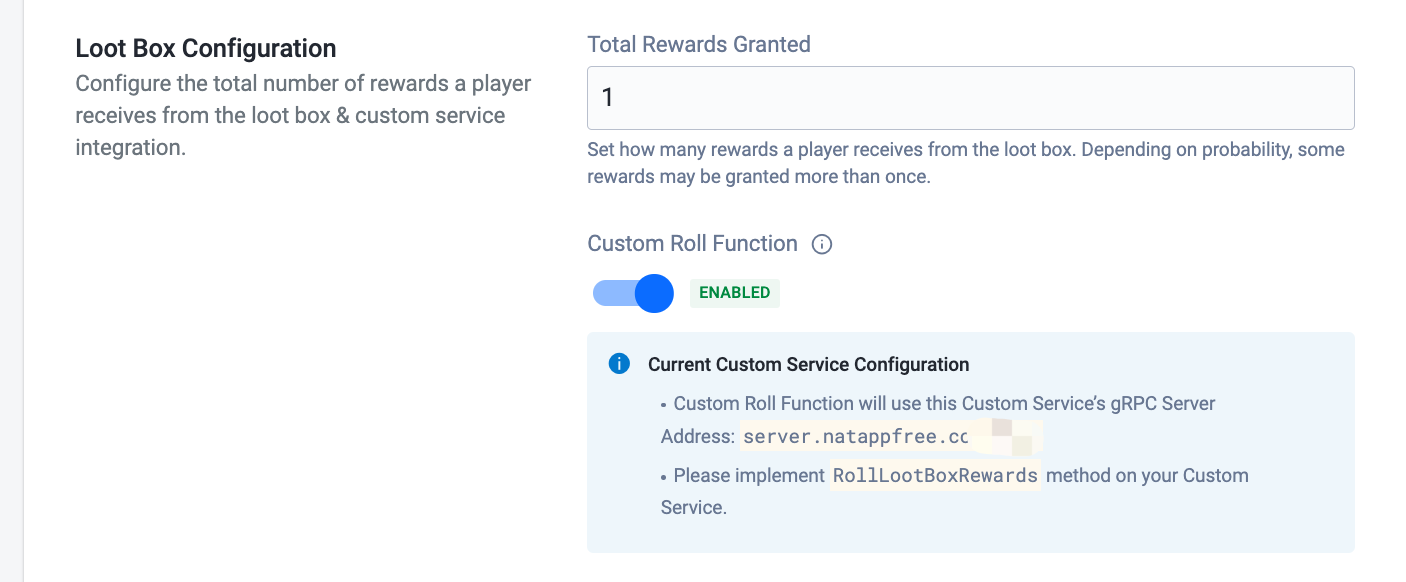
For a Loot Box, fill in the Loot Box Configuration section:
- Total Rewards Granted: the number of items granted to the player when they open the loot box.
- Custom Roll Function: Customize loot box roll function method so that you can define your own loot box reward logic and mechanism other than our default implementation. Make sure your gRPC server address is properly set in Custom Service Configuration.
Fill the Pricing Configuration section:
- Currency Namespace: the source of your currency.
- Currency Code: the currency code used to purchase the item.
- Price of the item: if you want to make an item free, set the price as 0. When you set a price in real currency, set the last two digits as decimals, i.e., if you have selected $ as your current symbol, 1.99 will set your item as $1.99 in your store.

Item Type: Option Box
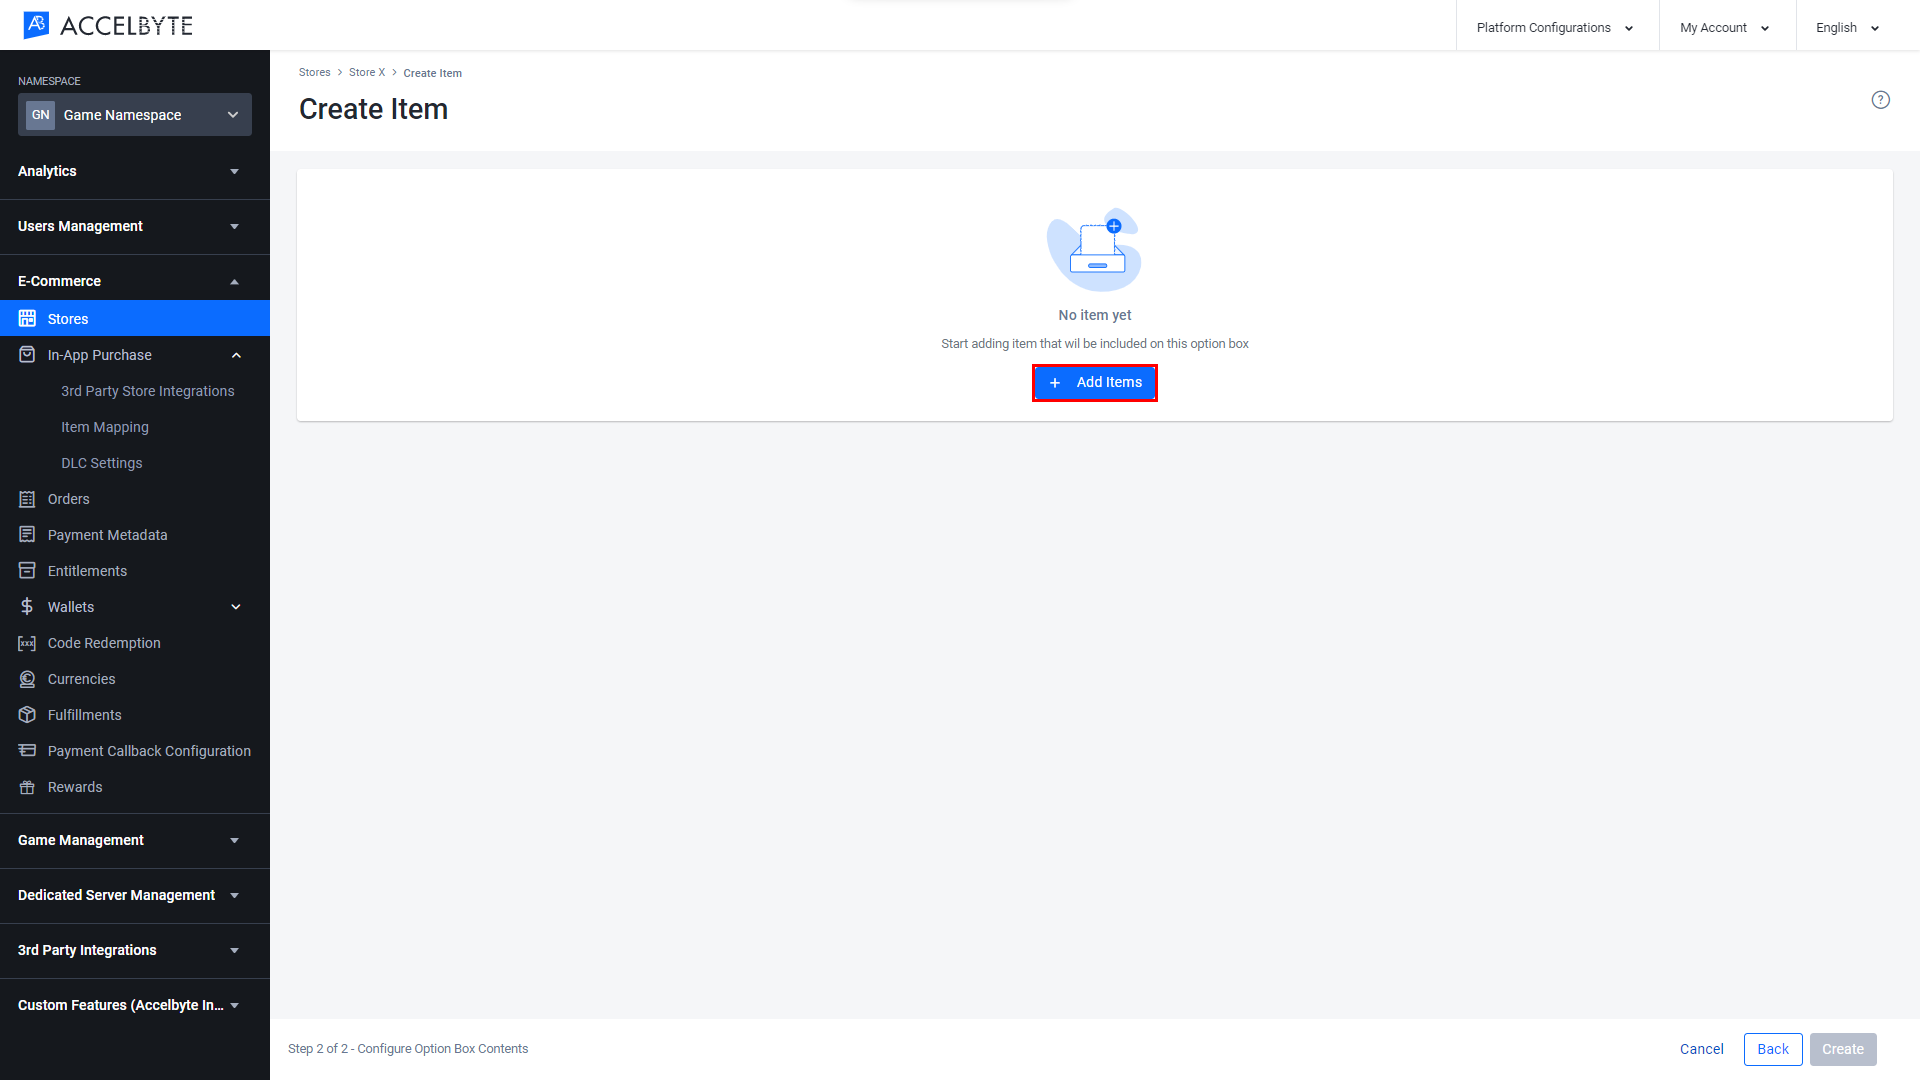
If you chose Option Box, click Next to include the items in the Option Box. If not, continue to the next section.
On the Create Item page, click Add Items to add items to the Option Box.
 note
noteYou can only add an item that's already been created.
The Add Item form will appear. Fill in the following information:
- Select the item type by selecting from the Type dropdown. You can choose In-Game Item, Coins, App, Season Pass, or Season Tier.
- Select the item you want to add from the Item Name dropdown.
- Input the number of items you want to add in the Quantity field.
If you want to add more options, click Add More Items.
When you have finished adding items, click Save.
Item Type: Loot Box
If you are creating a Loot Box, click Next to add items to the box or create item groups for the items in the box. If not, continue to the next section.

On the Create Item page, you can edit the number of items granted by the loot box by clicking the pencil icon next to the Total Items Granted field and changing the number to the desired value. You can also add items or item groups to the loot box. An item group allows you to assign the same probability value to multiple items.
- For example, you can group items into groups like Common, Rare, and Ultra Rare, and assign each group a probability value. If 80% probability is assigned to Common group, that means there is 80% chance that items from Common group will be rewarded to a player when a loot box is opened.
- To add an item to the loot box, click Add Item, or click Add Item Group to add an item group.
If you click Add Item, the Add Item form will appear. Fill in the following information:
- Select the type of item you want to add from the Type dropdown menu.
- Type the desired item name, search and choose the correct item in the Item Name field.
- Type the probability this item will appear in a loot box in the Probability (%) field. For example, to set the probability that the item will appear to 20%, type 20.
- Type the quantity of the item to appear in the loot box in the Quantity field.
When you're done, click Add to add the item to the loot box.
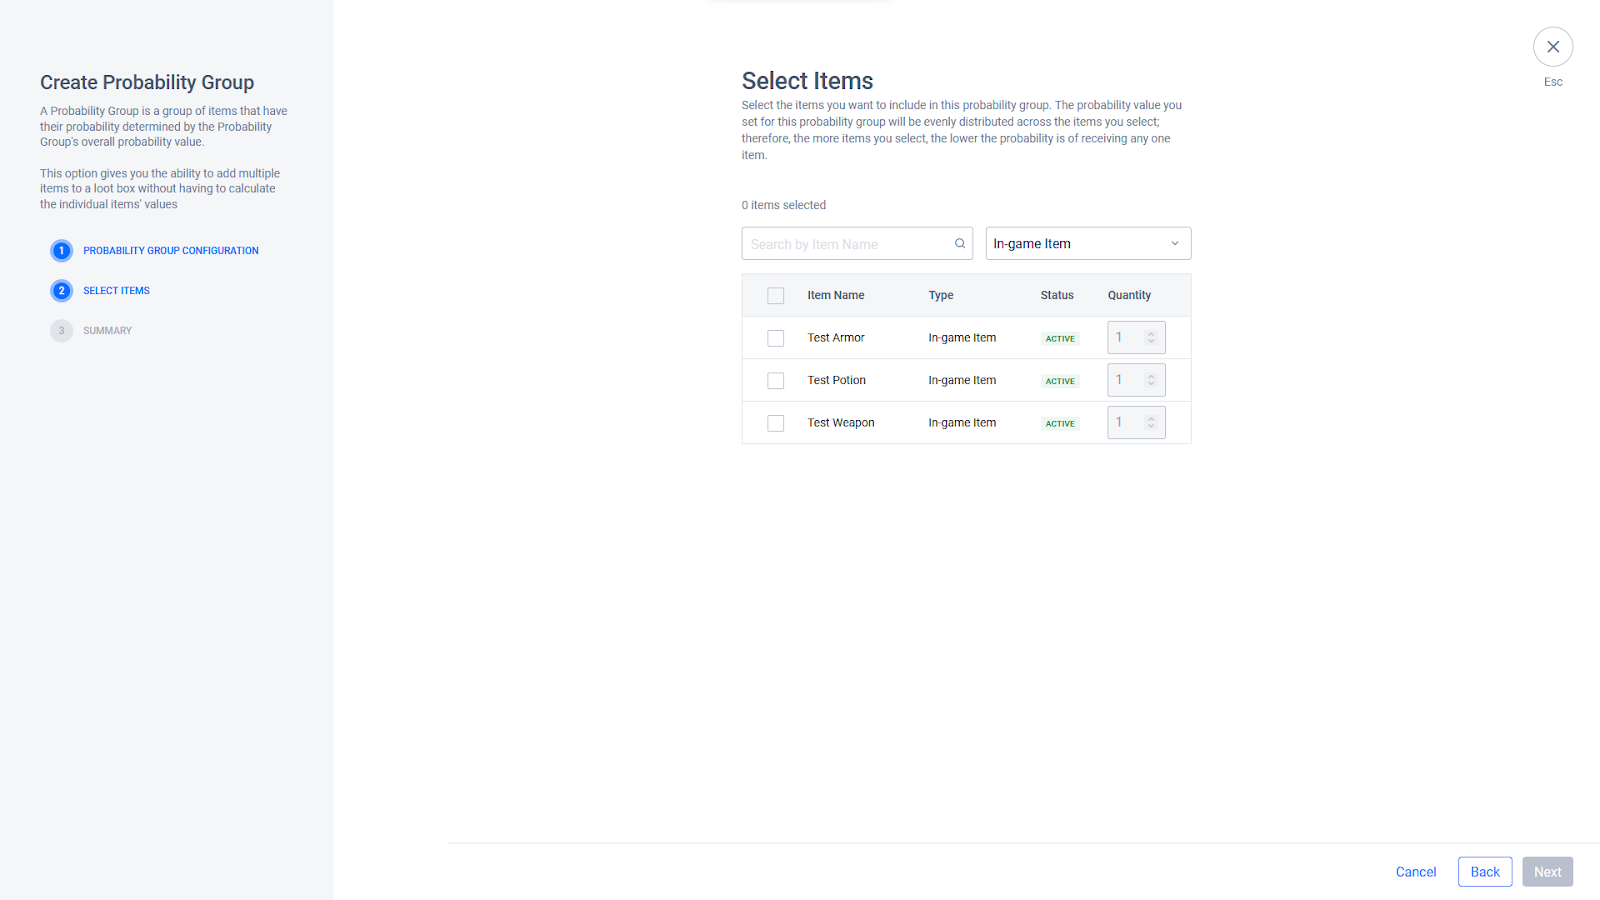
If you click Add Item Group, the Item Group Configuration wizard will open. On the first page, fill in the desired Item Group Name and then type the desired probability value for this group in the Probability (%) field. Then click Next.

On the Select Items page, select the items you would like to include in the item group. You can search for a specific item by typing its name in the text box or filter items by item type by selecting the desired item type from the dropdown menu. When you're finished selecting items for the item group, click Next.
On the Summary page, you can edit either the Item Group Name or Probability value by clicking the pencil icon next to either field. You can also adjust the quantity of each item in the group by changing the value in the Quantity field. When you're finished, click Create.
When you have finished, click Add or Create and your item will be added to your store's Item list.
Item Type: Bundle (Flexible)
If you are creating a flexible Bundle, fill in basic information, then click Next to include bundle items and to set up price configuration (make sure you have enabled flexible bundling price).

For price configuration, bundle price is not required since it is calculated automatically based on bundle item prices, player's item ownership and discount (if configured).
note"By Amount" discount type is not allowed when choosing flexible bundling price

Make sure you have configured pricing for all your bundle items for all currencies in all regions that you have been set for your bundle. You should see red exclamation marks if they are not set up properly
notewe do not recommend to configure multiple price records for individual items added to the bundle for the same region/currency code
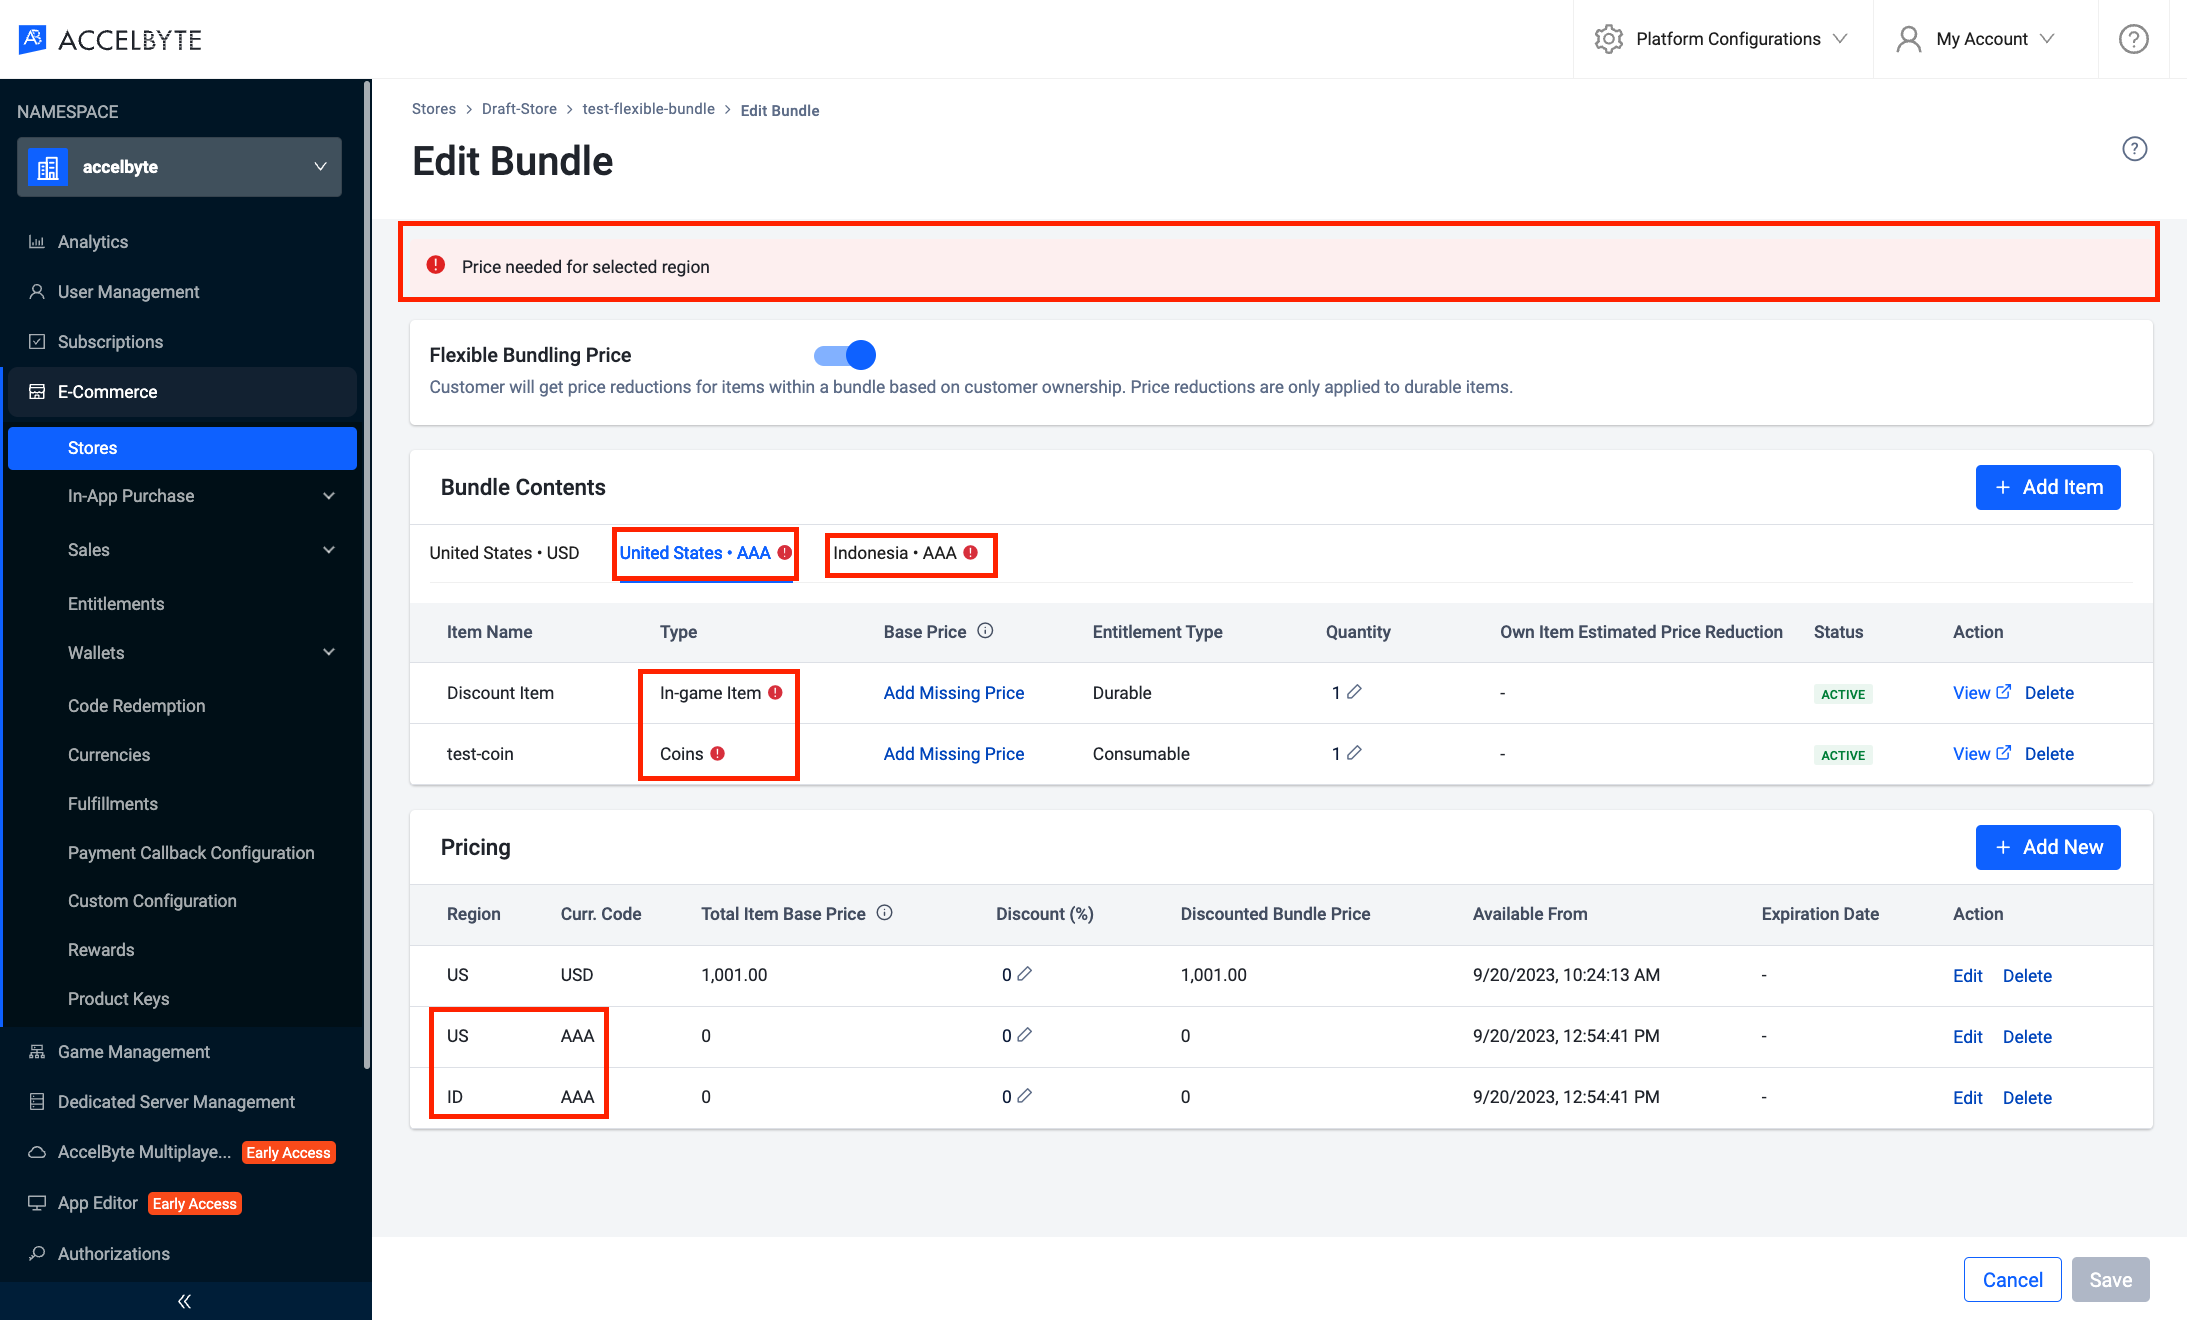
You can click "Adding Missing Price" to edit it in the same page or click "View" to edit it in another tab or even search the bundle item in the store and fix it
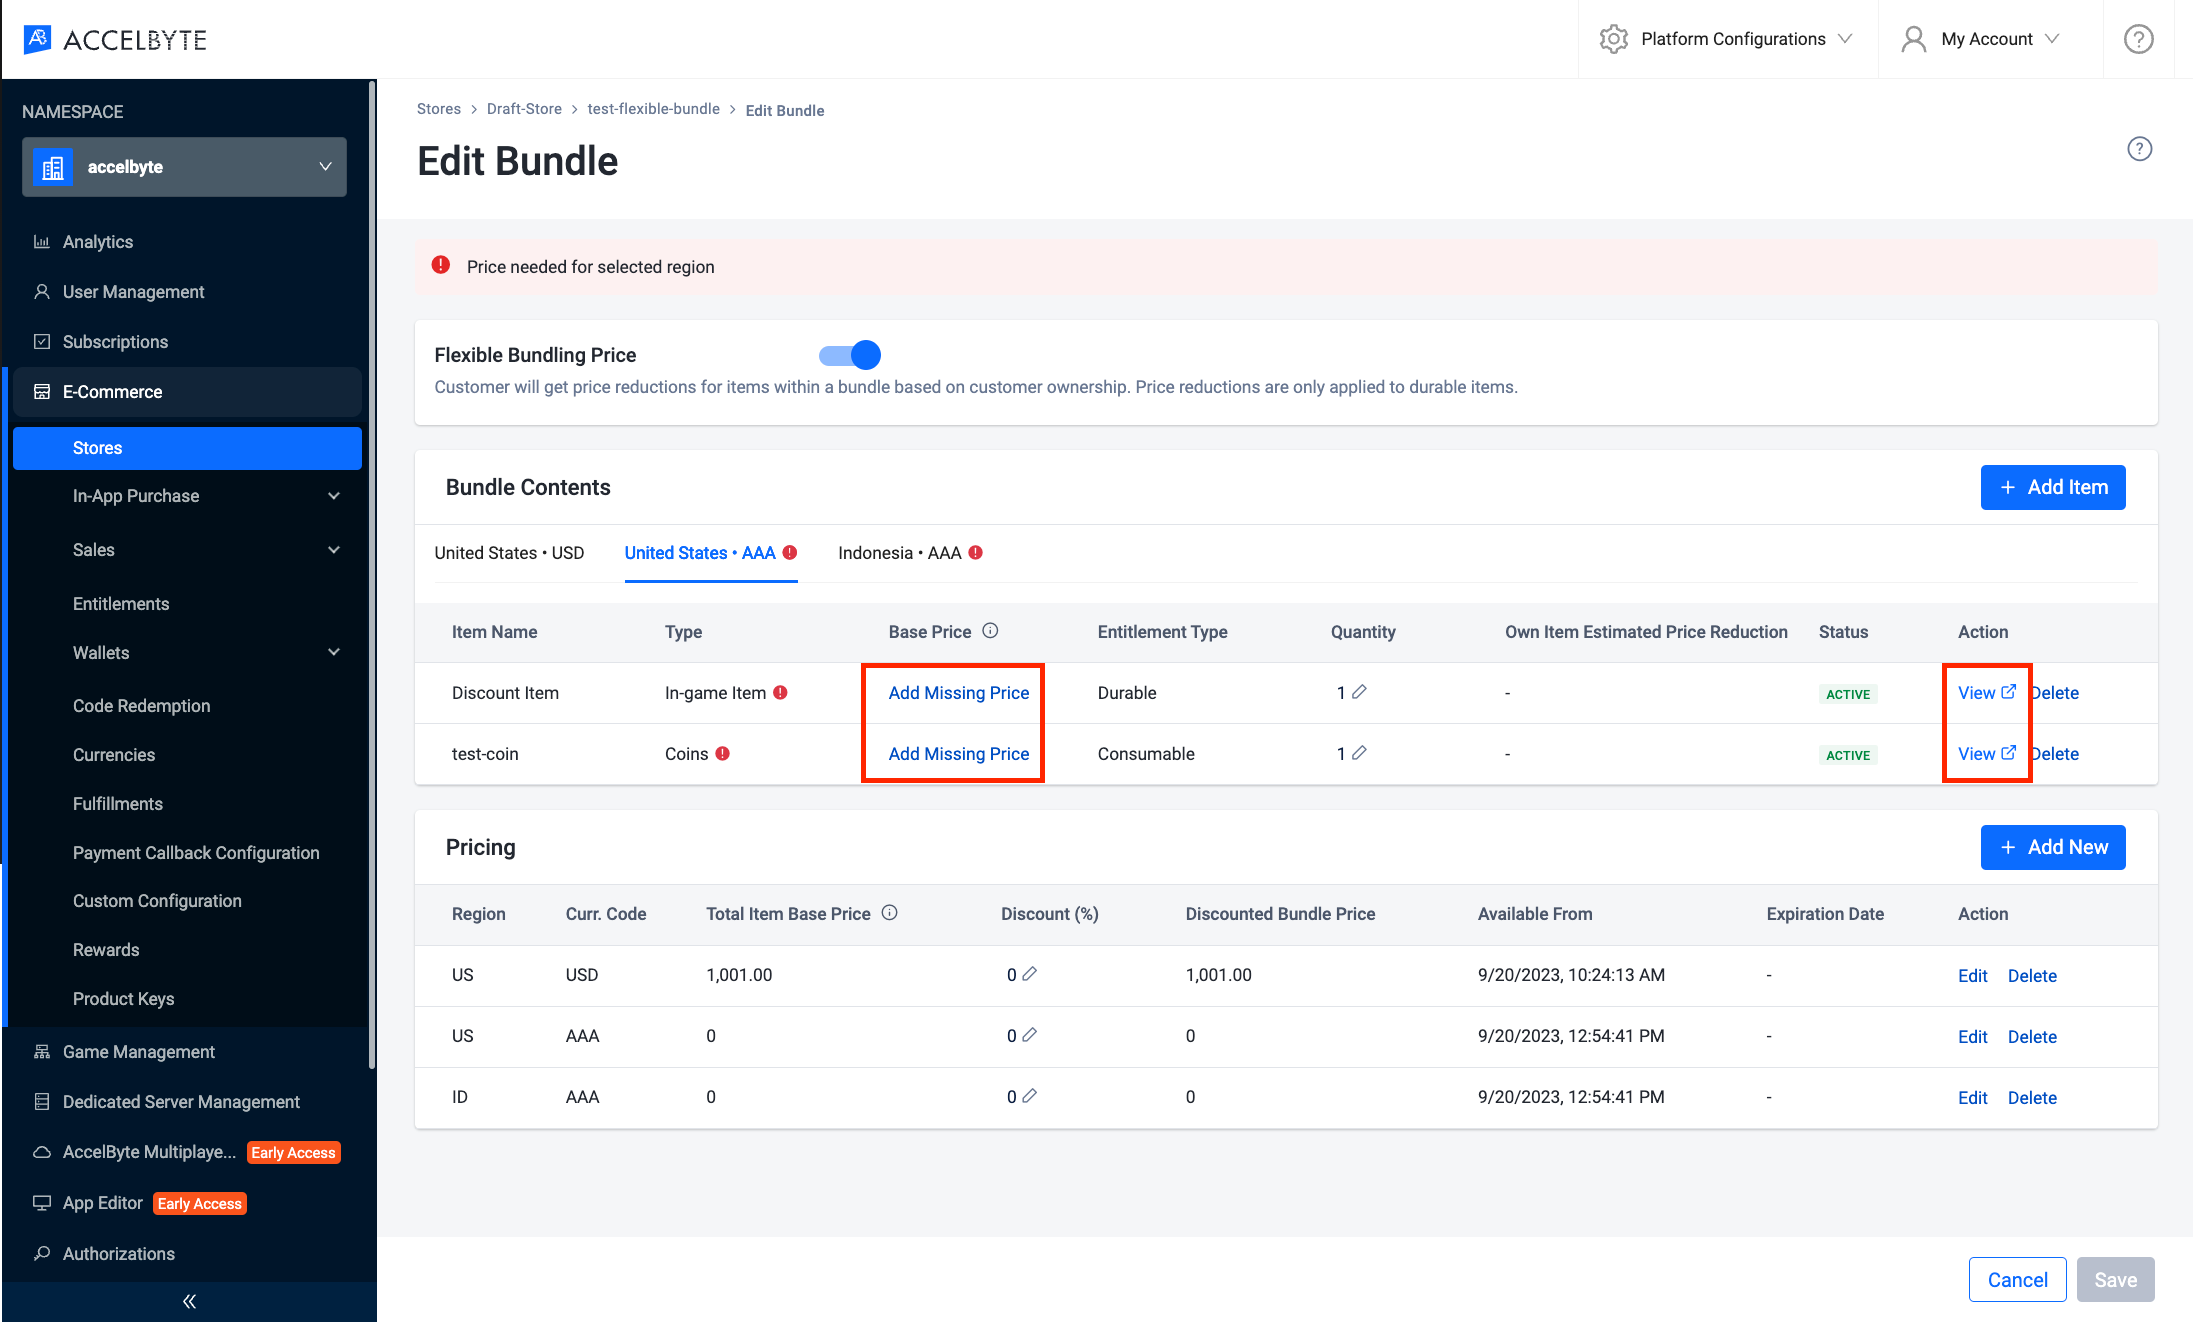
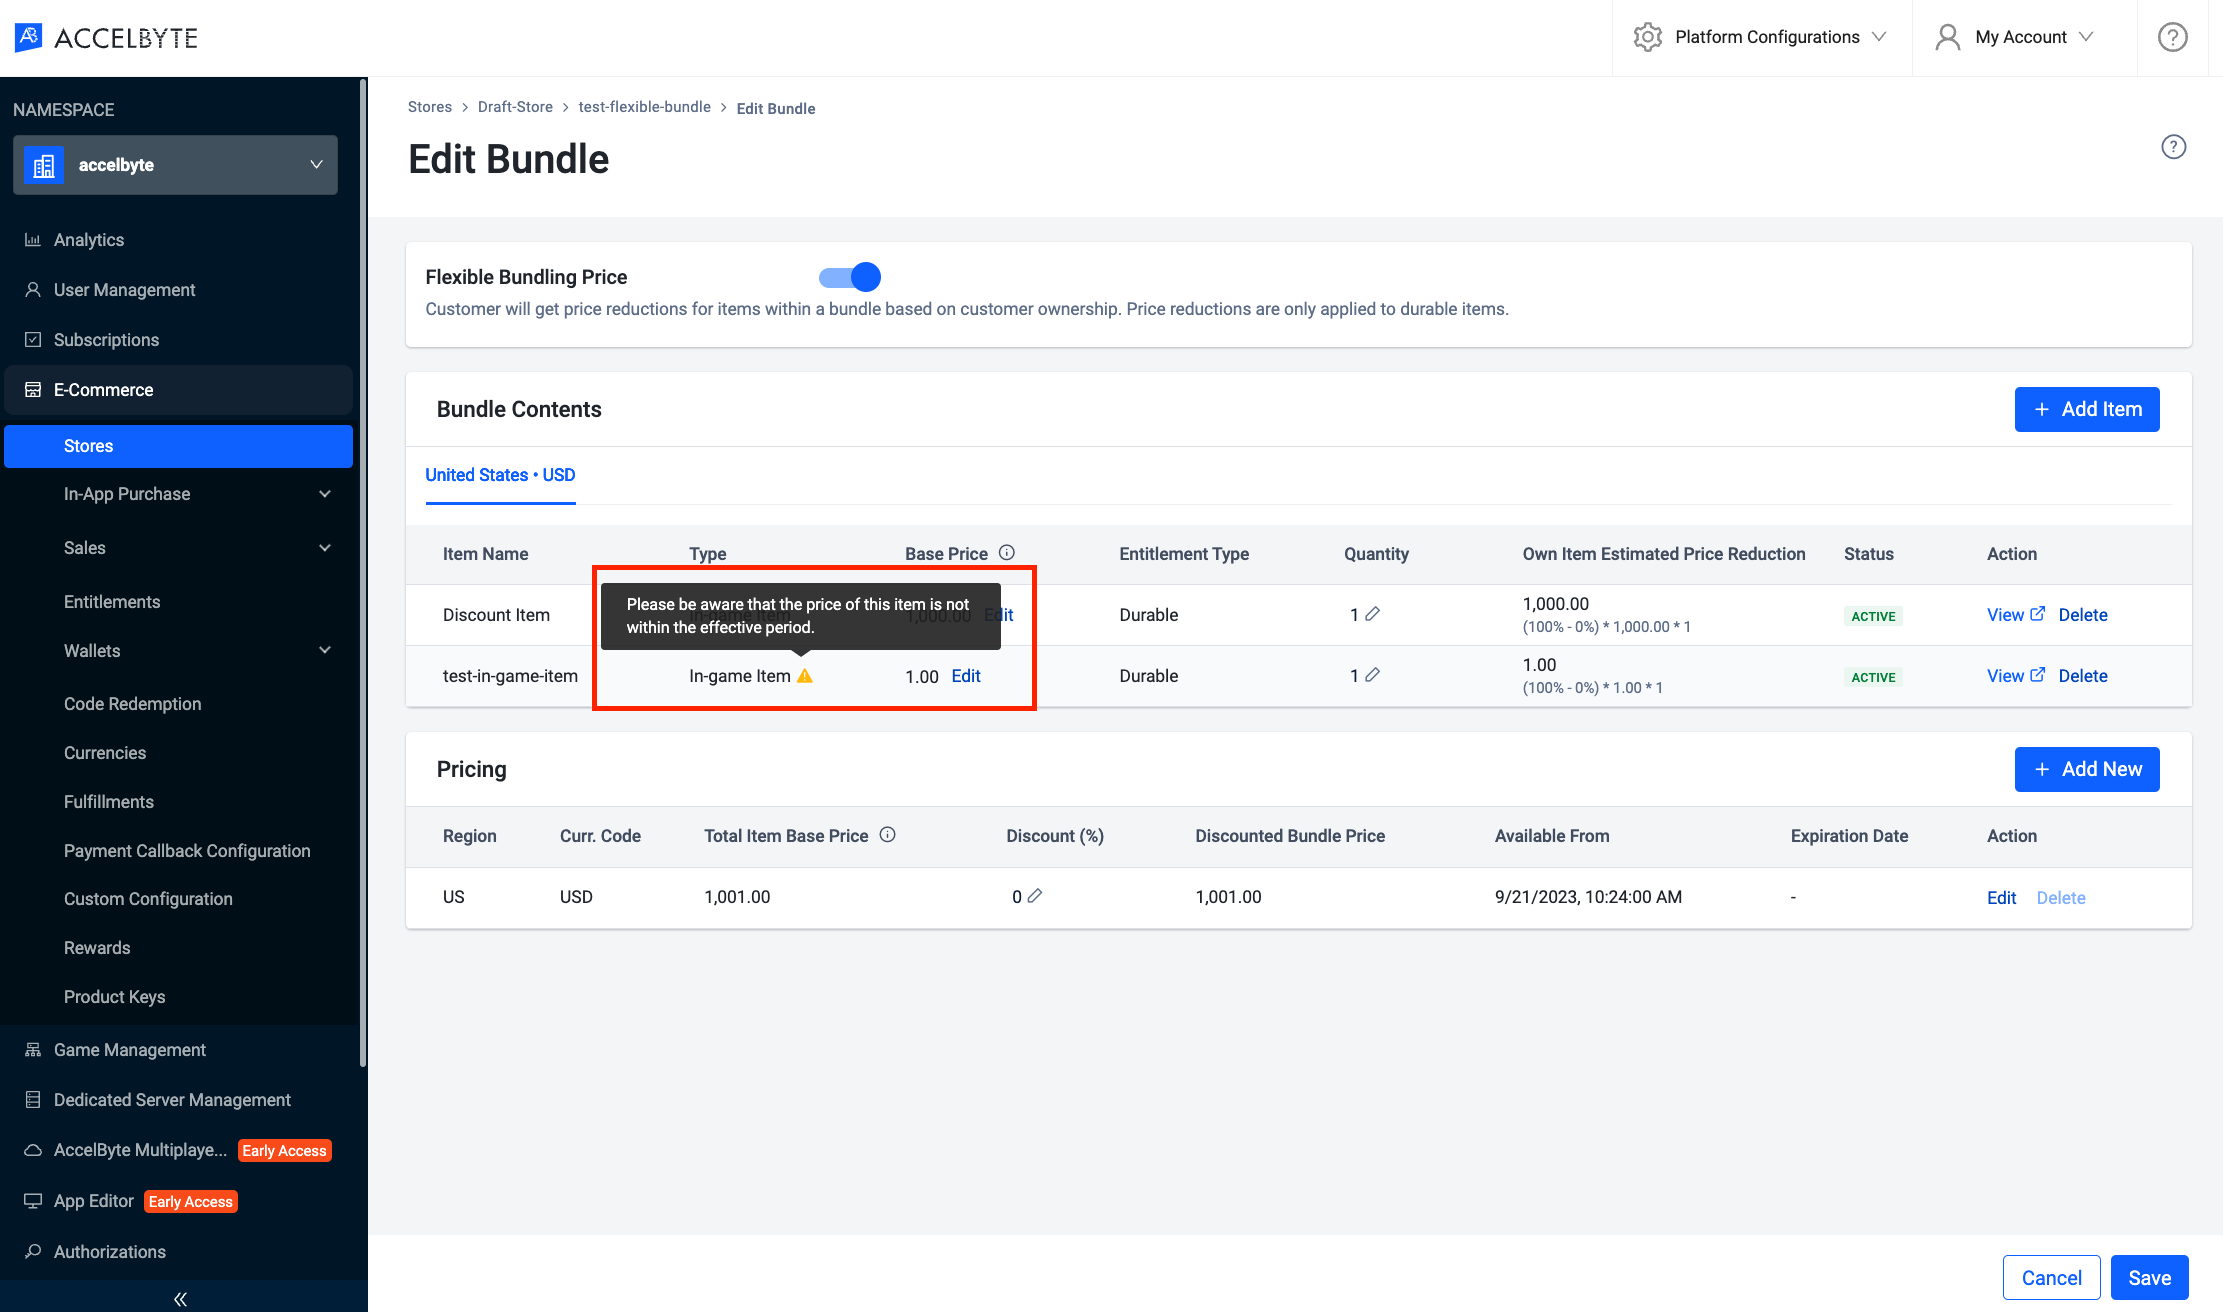
You should see yellow exclamation mark and a tooltip to warn you if the bundle item price is not effective yet
Confirm prices, available and expiration dates are correct, then click "Save"
noteDiscounts applied to bundle items will be automatically reflected in flexible bundle pricing
Disable an Item in a Store
You can disable an item in your draft store. Here's what will happened if you disable an item:
- Its status will be changed to inactive.
- A published inactive item will not be visible at your store.
- If the item is in a Bundle, Reward, or Code Redemption, users will not receive the published inactive item.
- If the item is in an Option Box or a Loot Box, users will not be able to select the item.
To disable an item, follow steps these steps:
In the Admin Portal, go to your draft store and find the item you want to disable.
Click the ellipses icon in the Action column, then click Disable.

A Disable Item confirmation box appears.
Click the Disable button.
Delete an Item in a Store
You can delete an item in your draft store. Follow steps below:
- In the Admin Portal, go to your draft store and find the item you want to delete.
- Click the three-dots icon in the Action column, then click Delete.
- A Delete Item confirmation box appears.
- Type DELETE in the field provided, then click the Delete button.
Purchasing Requirements
You can set purchasing requirements for each item, meaning that the player can only purchase the item if they have satisfied the requirements.
Add Purchasing Requirements
You can create multiple purchasing requirements for each item you want to sell in your store. Each purchasing requirement stored in a group can contain more than one requirement.
The interaction between groups is OR, meaning that a player could pass only one group to be able to purchase an item.
The interaction between requirements within the same group is logical AND, meaning that the player must fulfill every requirement in the group if that group is used to decide whether the player can purchase this item or not.
To add purchasing requirements to an item, follow these steps:
In the Admin Portal, go to your draft store and find the item you want to add purchasing requirements to. Click View in the Action column to open the item.
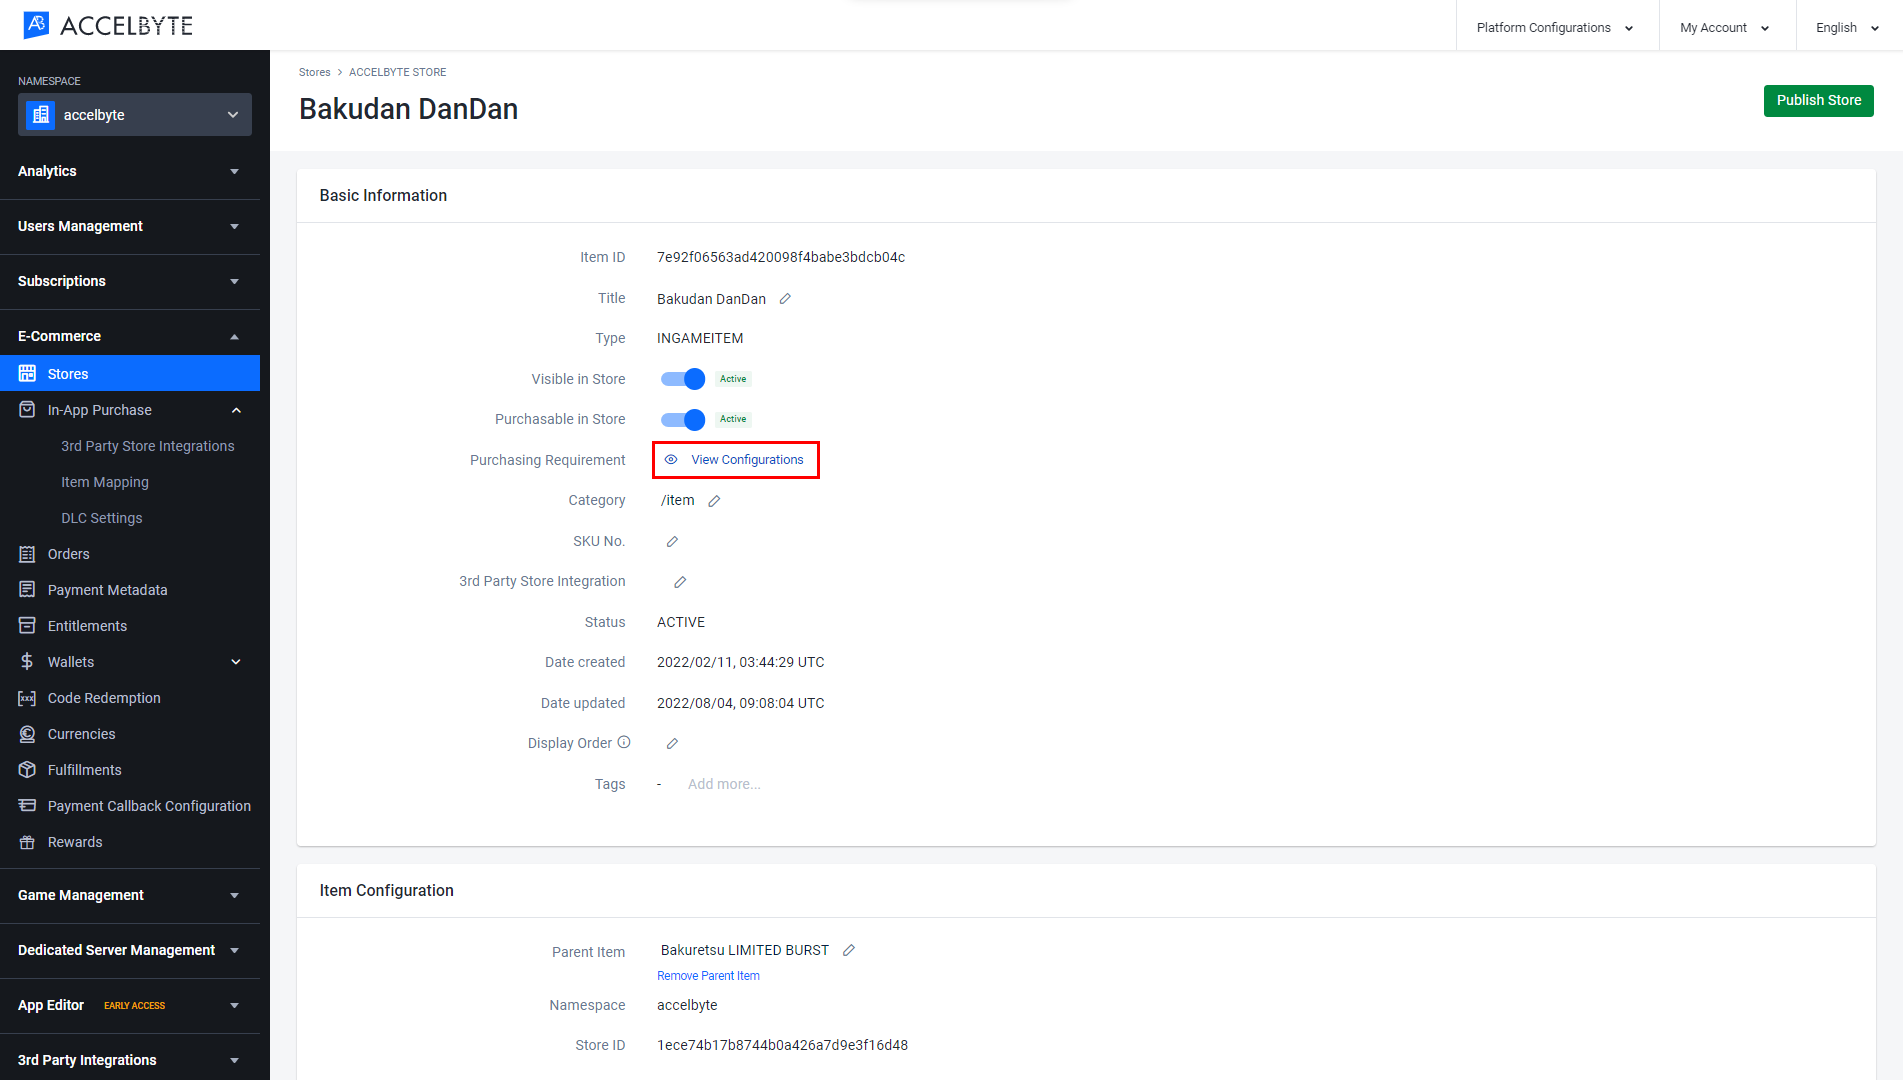
In the Basic Information section, next to the Purchasing Requirement, click View Configurations.
The Purchasing Requirement Configurations form appears.
Click the Add Configuration button.
A new group appears in the form. Enter the Requirement name and choose the Subject of the requirement from the dropdown.
noteCurrently the only Subject you can choose is Entitlement. An entitlement is a representation of an item that is owned by the player, that is, a sword may be created as an item in a store, but the sword a player owns is an Entitlement.
Three more fields display in the row. These are all connected to each other and are used to specify the requirements for the group.
Include: to choose to include or not include an item in the group.
Any: to select how many of the specified items to include or not include.
Item Selected: to specify the items to be included or not included.
Here are some examples:
Include Any 1 of the list of three items: If the player only has one of the three items in the list, the requirement is already satisfied.
Include Any 3 of the list of three items: This means that the player has to own all three items from the list to satisfy the requirement.
Not include Any 1 of the list of three items: If the player has any one of the three items in the list, the requirement is not satisfied.
Choose between include or not include from the dropdown.
Enter the number of items in the Any…Of field.
Add an item to the list by clicking the Item Selected dropdown, then click Add Item.
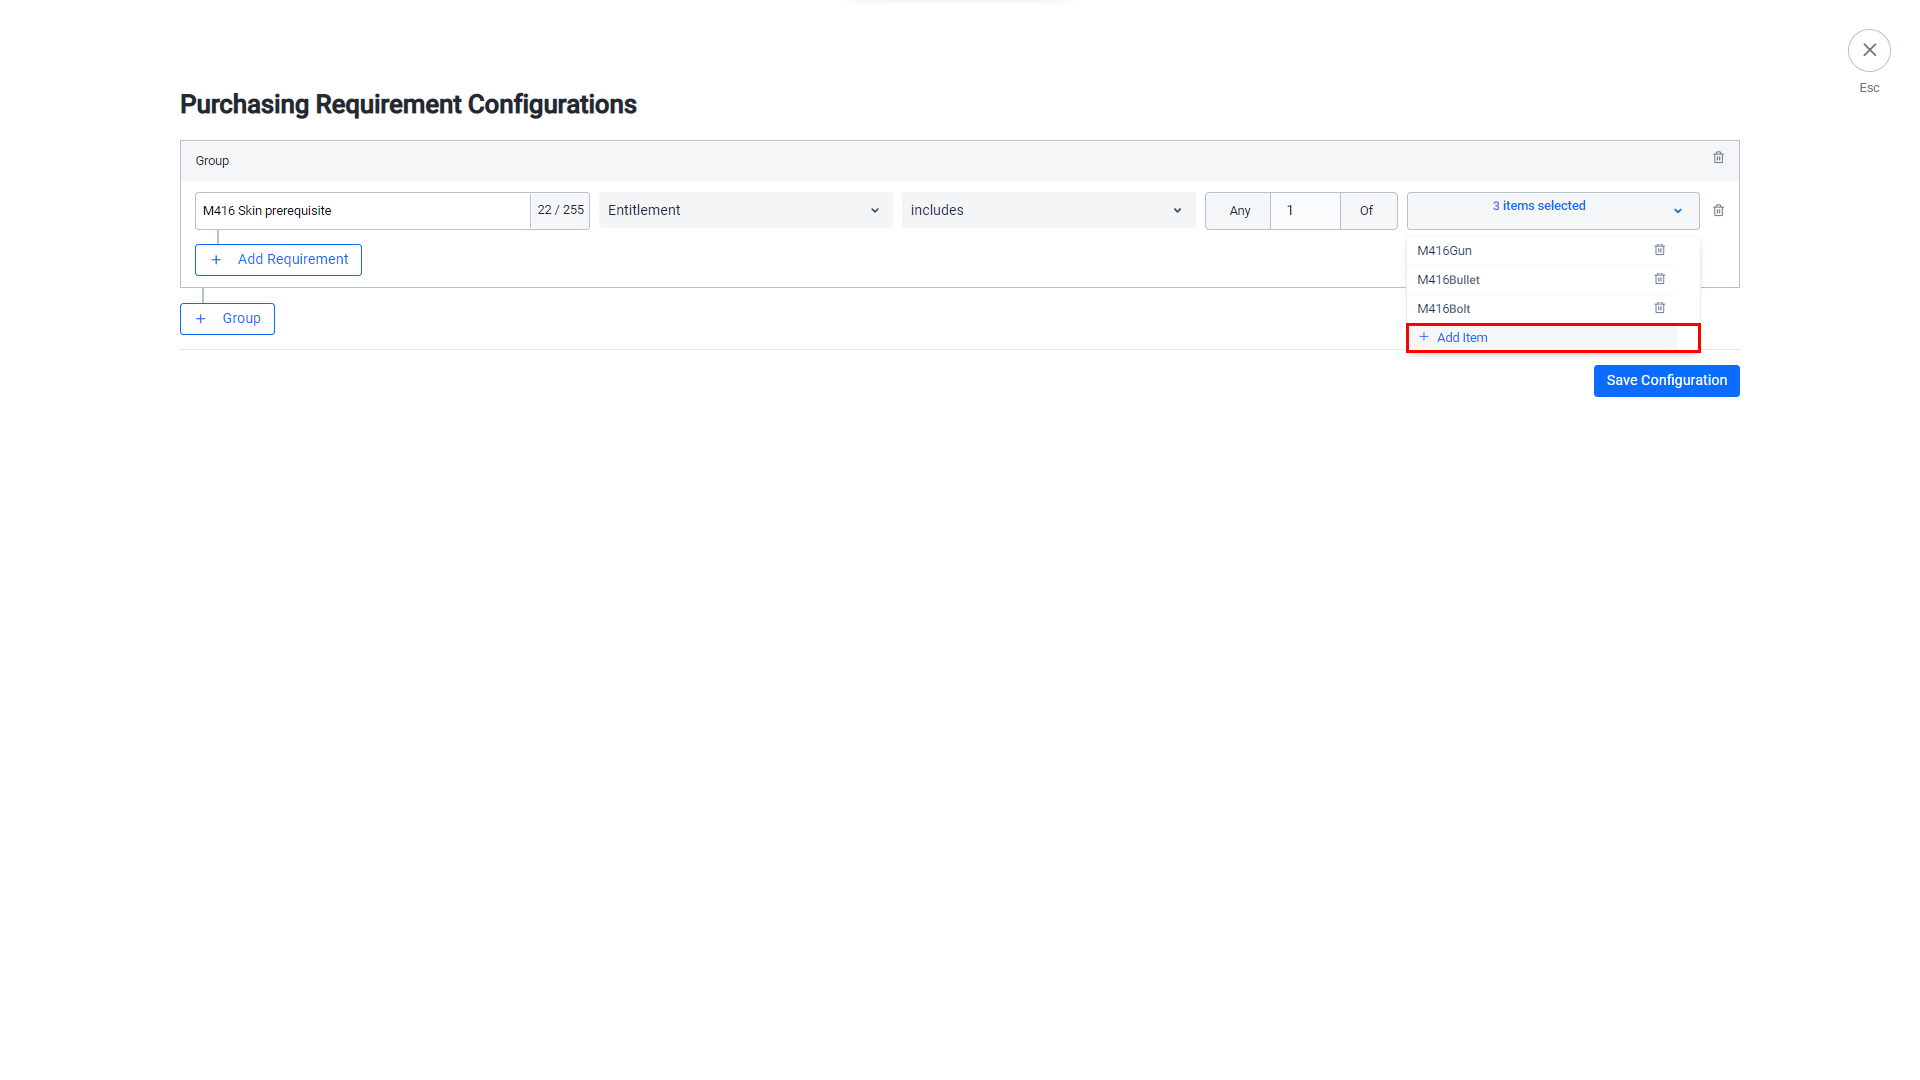
The Add Item form appears. Fill in the following information:
- Choose the Item Type from the dropdown.
- Choose the Item you have already created from the dropdown.
When you have finished, click Add.
To add new requirements to a group, click the Add Requirement button.
Click the Group button to add another group.
Create the requirements inside that group.
When you have finished creating the purchasing requirements, click the Save Configuration button.