Install the Unreal Engine SDK
Overview
You can use the AccelByte Gaming Services (AGS) Game Software Development Kit (SDK) for Unreal Engine to implement AGS in your game. The SDK acts as a bridge between your game and AGS.
Unreal Engine SDK on GitHubPrerequisites
- Unreal Engine 4 versions 4.26 or 4.27, or Unreal Engine 5 version 5.0 or 5.1
- Create a Game Namespace
- Create an IAM Client
- Get the Client ID
If you are using the AGS Starter tier, make sure you use the following format for the BaseUrl, otherwise your API calls may return an error due to a domain mismatch:
https://<Game TitleID>.<environment name>.gamingservices.accelbyte.io
- Use the
devvalue when you're working on a development environment. For example:https://spaceshooter.dev.gamingservices.accelbyte.io - Use the
prodvalue when you're ready to launch to a live environment. For example:https://spaceshooter.prod.gamingservices.accelbyte.io
Tutorial
Follow this tutorial to learn how to set up our Unreal Engine SDK.
In Starter tier, you can download the configuration file for Unreal Engine and save the file for this installation.
You can download the configuration files in the Starter tier dashboard during setup. Later, you can also download them from the OAuth Clients page in the AccelByte Admin Portal.
AGS Premium does not yet have the configuration file download option.
Download and install the Unreal SDK Plugin
Open your project with the Unreal Editor.
Copy the plugin folder
Plugins/AccelByteUe4Sdkfrom the downloaded SDK and paste it into your game'spluginsfolder. If your game doesn't have this folder yet, you can create a folder namedPluginsin your game project's root directory.Add this plugin to your
[MyAwesomeGame].uprojectfile."Plugins": [
...
{
"Name": "AccelByteUe4Sdk",
"Enabled": true
},
]
...Add this plugin to your
/Source/[MyAwesomeGame].Target.csfile.ExtraModuleNames.AddRange(new string[]
{
...
"AccelByteUe4Sdk",
...
}Add this plugin to your
/Source/[MyAwesomeGame]Editor.Target.csfile.ExtraModuleNames.AddRange(new string[]
{
...
"AccelByteUe4Sdk",
...
}Add this plugin to your
/Source/MyAwesomeGame/[MyAwesomeGame].Build.csfile.PublicDependencyModuleNames.AddRange(
new string[] {
...
"AccelByteUe4Sdk",
...
}
Configure the Game SDK
Before using the SDK, configure the AGS SDK in the Unreal Editor or input the JSON content into DefaultEngine.ini.
Input your configuration in Unreal Editor
Open your project with the Unreal Editor.
Ensure you configured the plugin in your project.
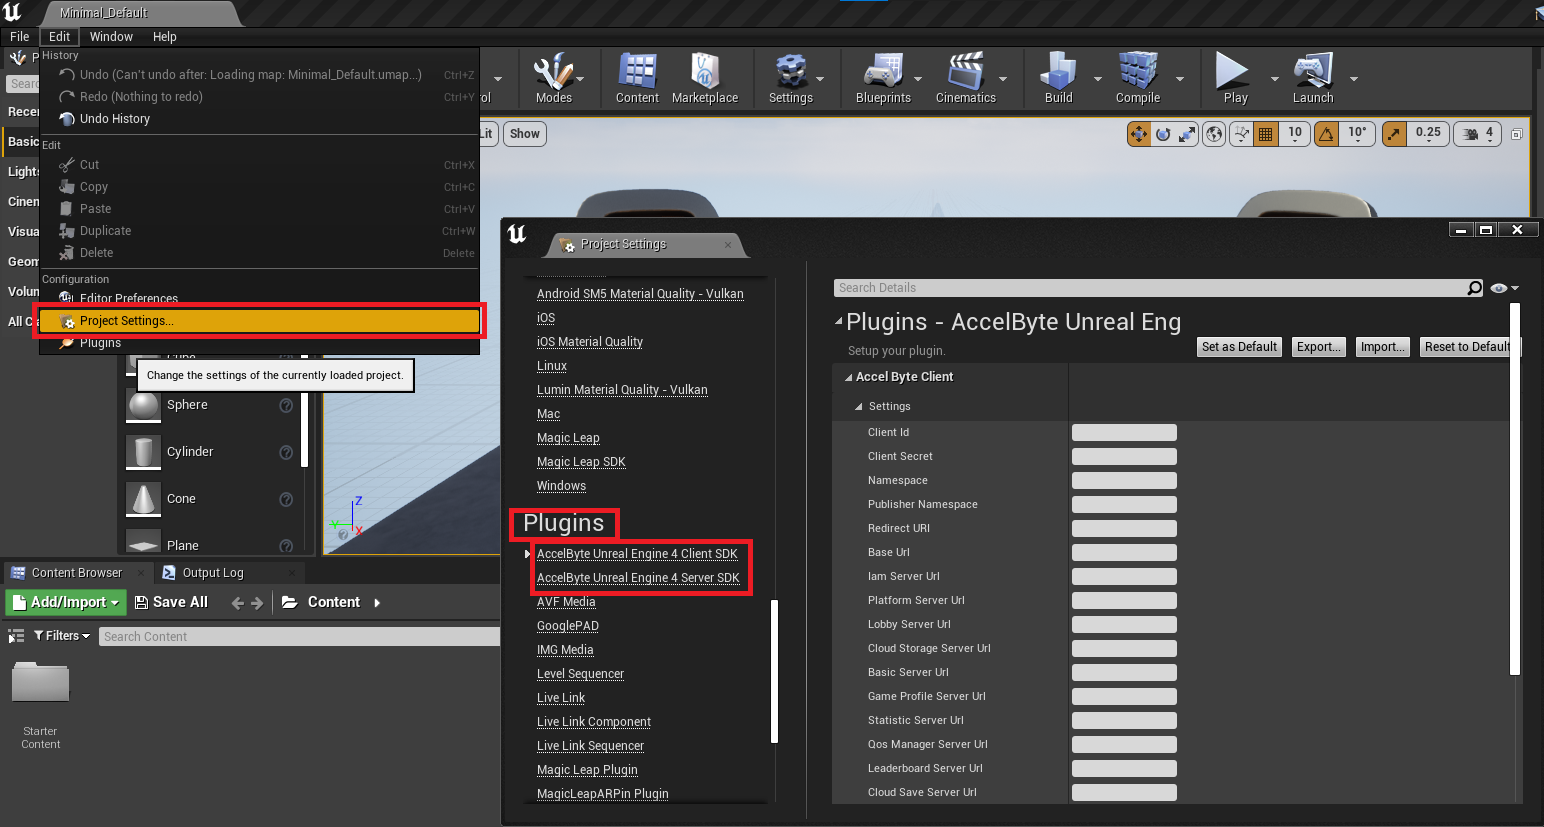
In the top menu bar, go to Edit > Project Settings.
In Project Settings, scroll down to the Plugins section and select AccelByte Unreal Engine 4 Client SDK.
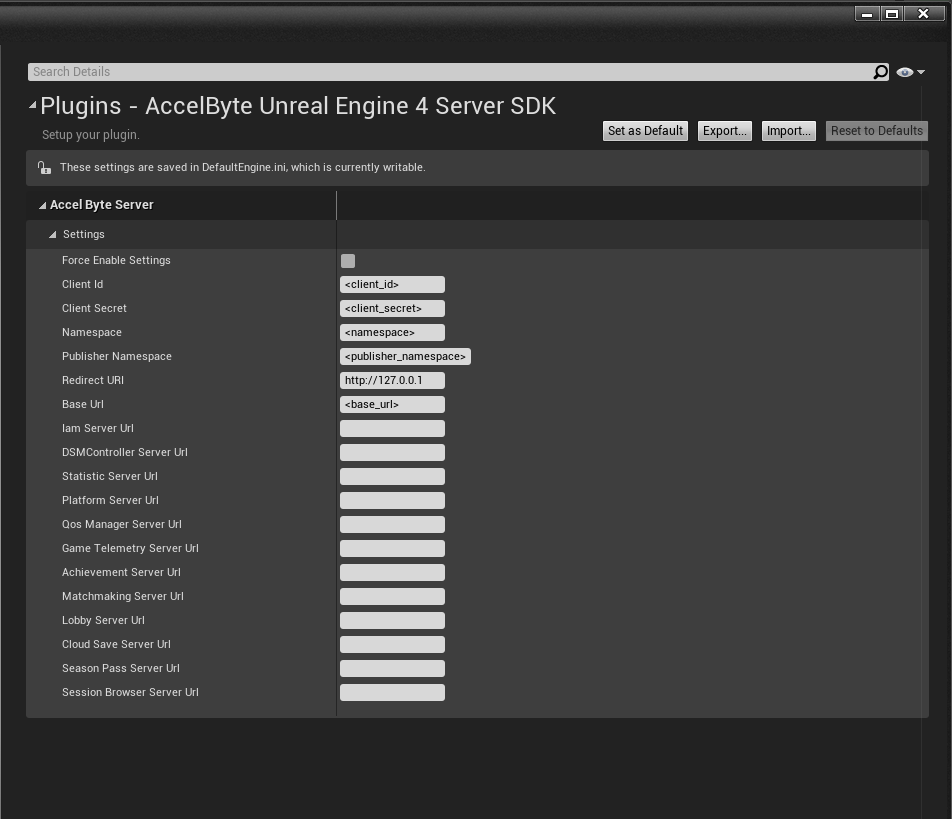 note
noteLeave the Publisher namespace parameter empty.
Fill in Client ID, Client Secret, Namespace, Redirect Uri and Base Url. Leave the remaining input fields empty.
NoteContact support or your Account Manager if you don't know your API URLs. If you're using AGS Starter, the URL format is
https://<Game TitleID>.<environment name>.gamingservices.accelbyte.io.- Use the
devvalue when you're working on a development environment. For example:https://spaceshooter.dev.gamingservices.accelbyte.io - Use the
prodvalue when you're ready to launch to a live environment. For example:https://spaceshooter.prod.gamingservices.accelbyte.io
- Use the
Click Set as Default to save your configuration. This should populate the
DefaultEngine.inifile in the/Configfolder automatically.
Input JSON content into DefaultEngine.ini
In the
/Configfolder, openDefaultEngine.ini.Input your information using the following format:
noteLeave the Publisher namespace empty.
[/Script/AccelByteUe4Sdk.AccelByteSettings]
ClientId=<client_id>
ClientSecret=<client_secret>
Namespace=<namespace>
PublisherNamespace=<>
RedirectURI="http://127.0.0.1"
BaseUrl=<base_url>
AppId=<app_id>infoEnsure you enter the ClientId, ClientSecret (if applicable), Namespace, AppId (for Steam Games), BaseURL, and RedirectUri. Find your ClientId, ClientSecret, and Namespace settings in the AGS Admin Portal, or refer to the Access documentation.
Contact support or your Account Manager if you don't know your API URLs. If you're using AGS Starter, the URL format is
https://<Game TitleID>.<environment name>.gamingservices.accelbyte.io.- Use the
devvalue when you're working on a development environment. For example:https://spaceshooter.dev.gamingservices.accelbyte.io - Use the
prodvalue when you're ready to launch to a live environment. For example:https://spaceshooter.prod.gamingservices.accelbyte.io
- Use the
If you are implementing our Multiplayer services using a Dedicated Server, then you need to input the Server Settings too. The format is as follows:
[/Script/AccelByteUe4Sdk.AccelByteServerSettings]
ClientId=<client_id>
ClientSecret=<client_secret>
Namespace=<namespace>
PublisherNamespace=<publisher_namespace>
RedirectURI="http://127.0.0.1"
BaseUrl=<base_url>
It is highly recommended to remove the Server Settings when building a Game Client as a Shipping build. In order to do this, the following command in the PreBuildSteps in the AccelByteUe4Sdk.uplugin file needs to be set to True.
"PreBuildSteps": {
        "Win64": [
            "call \"$(PluginDir)\\PreBuildProcessor.bat\" \"$(EngineDir)\" \"$(ProjectDir)\" $(TargetConfiguration) $(TargetType) True"
        ]
    }
The PostBuildSteps in the same file will revert back your DefaultEngine.ini file back to its original state after the build process.
Additional features
AGS now supports additional features that you can enable in [/Script/AccelByteUe4Sdk.AccelByteSettings].
Client-Side Data Caching (In-Memory): You can now cache static data/files in memory to reduce HTTP calls. To activate this feature, ensure that the service sending the response can provide HTTP Cache Control headers.
[/Script/AccelByteUe4Sdk.AccelByteSettings]
...
bEnableHttpCache=true
Quality of Service (QoS) Scheduled Latencies Updater: we created a scheduler that updates the latencies on all specified areas. This feature helps game developers implement matchmaking in multiple regions.
You can specify the time interval for the scheduler. The system initiates polling at the authentication level because it must update latencies to eliminate bottlenecks before matchmaking. Players may also want to know their region latencies (ping) before they begin matchmaking.
[/Script/AccelByteUe4Sdk.AccelByteSettings]
...
QosLatencyPollIntervalSecs=0
QosServerLatencyPollIntervalSecs=0
The default value for both parameters is
0.To enable the scheduler, set
QosLatencyPollIntervalSecsto a value greater than 0. When active, the minimum polling interval is 10 minutes.To enable the scheduler for other regions, set
QosServerLatencyPollIntervalSecsto a value greater than 0.
Congratulations! You successfully configured the AGS SDK for Unreal Engine.