Install the Unity SDK
Overview
Use the AccelByte Gaming Services (AGS) Game SDK for Unity to implement AccelByte Gaming Services (AGS) features in your game.
AGS Unity SDK on GitHubPrerequisites
- Unity version 2019 or newer
- Create a Game Namespace
- Create an IAM Client
- Get the Client ID
AGS Starter currently supports Unity versions 2019.2 and 2019.4 upwards.
Also, make sure that you use the following format for the BaseUrl, otherwise your API calls may return an error due to a domain mismatch:
https://<Game TitleID>.<environment name>.gamingservices.accelbyte.io
- Use the
devvalue when you're working on a development environment. For example:https://spaceshooter.dev.gamingservices.accelbyte.io - Use the
prodvalue when you're ready to launch to a live environment. For example:https://spaceshooter.prod.gamingservices.accelbyte.io
Tutorial
You must install and configure Git on your computer so that Unity can use a UPM Package.
Install and configure
Learn how to download and install the AGS Game SDK for Unity and set up your AGS configuration file.
In Starter tier, you can download and save the configuration file for Unity.
You can download the configuration files in the Starter tier dashboard during set up. Later, you can also download them from the OAuth Clients page in the AGS Admin Portal.
AGS Premium does not yet have the configuration file download option.
Open your Unity Project.
Go to Window > Package Manager > + > Add package from git URL, paste
https://github.com/AccelByte/accelbyte-unity-sdk.gitinto the pop-up, and click Add.noteEnsure that you download the latest version.
If you are using Assembly Definitions in your project, you may need to add the com.accelbyte.UnitySDK assembly as a reference.
Configure the SDK.
There are two ways to configure the SDK in your project. You can use our editor tool or manually create and modify the configuration files.
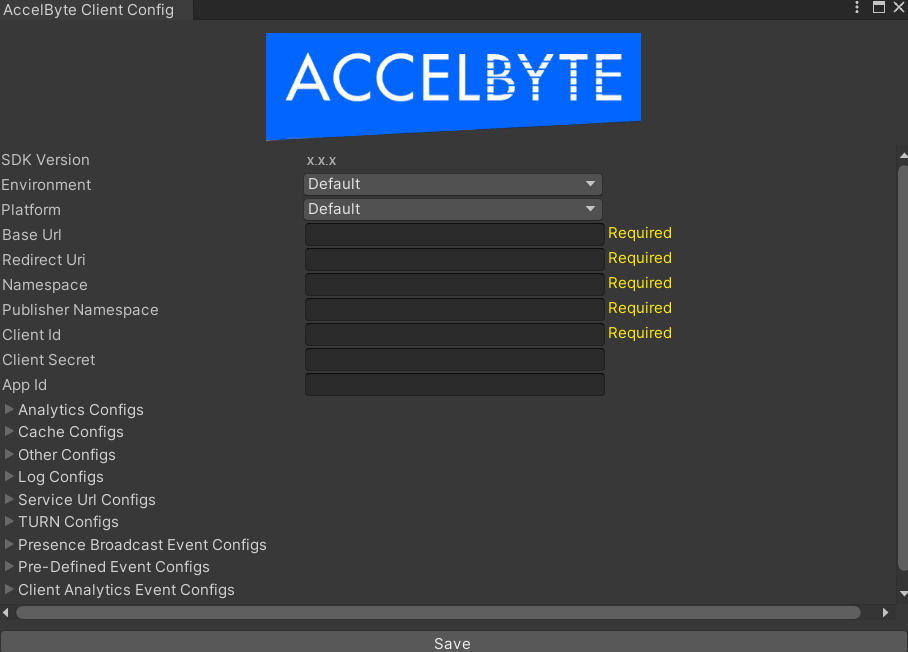
Configure the SDK using the Editor tool
Go to AccelByte > Edit Client Settings in the menu bar to edit client configuration or Edit Server Settings for server configuration. Fill out required fields shown on the editor. After filling out the fields and click Save.
After you do this, the client editor will generate and auto populate the
AccelByteSDKConfig.jsonandAccelByteSDKOAuthConfig.json. The server editor will generateAccelByteServerSDKConfig.jsonandAccelByteServerSDKOAuthConfig.json. Every AccelByte SDK config file will be saved in theAssets/Resourcesfolder.Create config files manually
Create these files in your
Assets/Resourcesfolder and fill it with the appropriate format. Replace the "Required" value based on the AGS Admin Portal config.- Client Configs
- Server Configs
AccelByteSDKConfig.json
{
    "Default": {
        "BaseUrl": "Required",
        "Namespace": "Required",
        "PublisherNamespace": "Required",
        "RedirectUri": "Required",
        "UsePlayerPrefs": false,
        "EnableDebugLog": true,
        "DebugLogFilter": "Verbose",
        "IamServerUrl": "",
        "PlatformServerUrl": "",
        "BasicServerUrl": "",
        "LobbyServerUrl": "",
        "CloudStorageServerUrl": "",
        "GameProfileServerUrl": "",
        "StatisticServerUrl": "",
        "QosManagerServerUrl": "",
        "AgreementServerUrl": "",
        "LeaderboardServerUrl": "",
        "CloudSaveServerUrl": "",
        "GameTelemetryServerUrl": "",
        "AchievementServerUrl": "",
        "UGCServerUrl": "",
        "ReportingServerUrl": "",
        "SeasonPassServerUrl": "",
        "SessionBrowserServerUrl": "",
        "SessionServerUrl": "",
        "MatchmakingV2ServerUrl": "",
        "UseTurnManager": true,
        "TurnManagerServerUrl": "",
        "TurnServerHost": "",
        "TurnServerPort": "",
        "TurnServerPassword": "",
        "TurnServerSecret": "",
        "TurnServerUsername": "",
        "PeerMonitorIntervalMs": 200,
        "PeerMonitorTimeoutMs": 2000,
        "HostCheckTimeoutInSeconds": 60,
        "GroupServerUrl": "",
        "ChatServerWsUrl": "",
        "ChatServerUrl": "",
        "GdprServerUrl": "",
        "AppId": "",
        "CustomerName": "",
        "EnableAuthHandshake": false,
        "MaximumCacheSize": 100,
        "MaximumCacheLifeTime": 100,
        "EnablePresenceBroadcastEvent": true,
        "PresenceBroadcastEventInterval": 600,
        "PresenceBroadcastEventGameState": 0,
        "PresenceBroadcastEventGameStateDescription": "",
        "EnablePreDefinedEvent": false,
        "EnableClientAnalyticsEvent": false,
        "ClientAnalyticsEventInterval": 10.0,
        "EnableAmsServerQos": false
    }
}
AccelByteSDKOAuthConfig.json
{
    "Default": {
        "ClientId": "Required",
        "ClientSecret": ""
    }
}
AccelByteServerSDKConfig.json
{
    "Default": {
        "Namespace": "Required",
        "BaseUrl": "Required",
        "RedirectUri": "Required",
        "IamServerUrl": null,
        "DSHubServerUrl": null,
        "DSMControllerServerUrl": null,
        "StatisticServerUrl": null,
        "UGCServerUrl": null,
        "PlatformServerUrl": null,
        "QosManagerServerUrl": null,
        "GameTelemetryServerUrl": null,
        "AchievementServerUrl": null,
        "LobbyServerUrl": null,
        "SessionServerUrl": null,
        "CloudSaveServerUrl": null,
        "MatchmakingServerUrl": null,
        "MatchmakingV2ServerUrl": null,
        "SeasonPassServerUrl": null,
        "AMSServerUrl": null,
        "WatchdogUrl": null,
        "AMSHeartbeatInterval": 15,
        "MaximumCacheSize": 100,
        "MaximumCacheLifeTime": 100,
        "EnablePreDefinedEvent": false,
        "StatsDServerUrl": null,
        "StatsDServerPort": 0,
        "StatsDMetricInterval": 0,
        "EnableDebugLog": true,
        "DebugLogFilter": "Verbose"
    }
}
AccelByteServerSDKOAuthConfig.json
{
    "Default": {
        "ClientId": "Required",
        "ClientSecret": ""
    }
}
To set up other environments, every config JSON is using the same template. For example, on Oauth config:
{
    "Default": {
        "ClientId": "Required",
        ...
    },
    "Development": {
        "ClientId": "Required",
        ...
    },
    "Certification": {
        "ClientId": "Required",
        ...
        },
    "Production": {
        "ClientId": "Required",
        ...
    }
}important- You can find your ClientID, Secret, and Namespace settings in the AGS Admin Portal.
- For AGS Starter, use the following formats:
- For Namespace:
<Studio ID>-<Game TitleID> - For Publisher:
<Studio ID>.
- For Namespace:
- Leave the Client Secret empty if the Game Client uses the Public Client type.
- Contact support or your Account Manager if you're unsure of your API URLs. If you're in AGS Starter, the development env's base URL is
https://prod.gamingservices.accelbyte.ioand the production env's base URL ishttps://prod.gamingservices.accelbyte.io.
Congratulations! You successfully configured the AGS SDK for Unity.